Nail design is more popular than ever. Beauty salons offer visitors more and more new techniques for decorating fingers. One of these options is the moon manicure, which was in demand in the 20s, but then completely forgotten and again reminded of itself in 2007, which bears the second name “moon jacket”.
Ways to perform a moon manicure
There are the following options for lunar manicure, performed using:
- stencil-stickers;
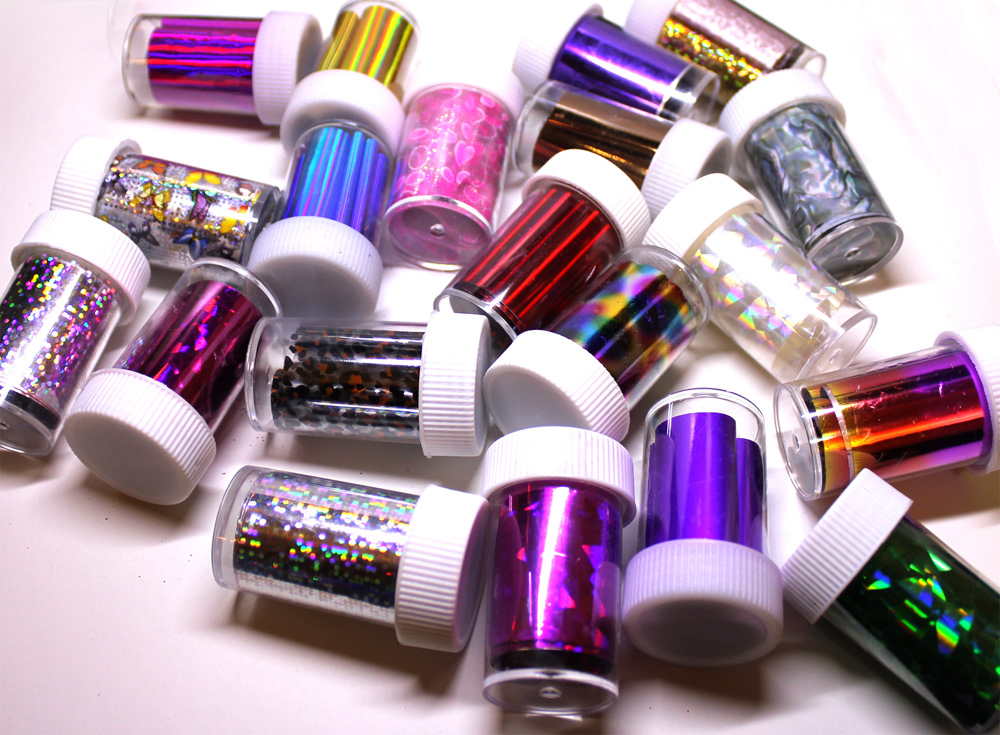
- colored foil;
- decorative brush.
Stencil-stickers

Lunar nail manicure with stencil
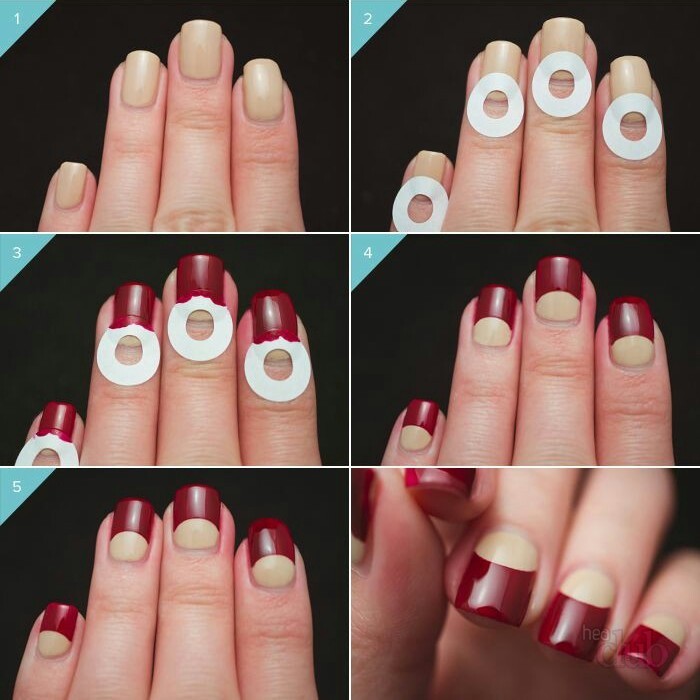
Lunar coverage is done as follows:
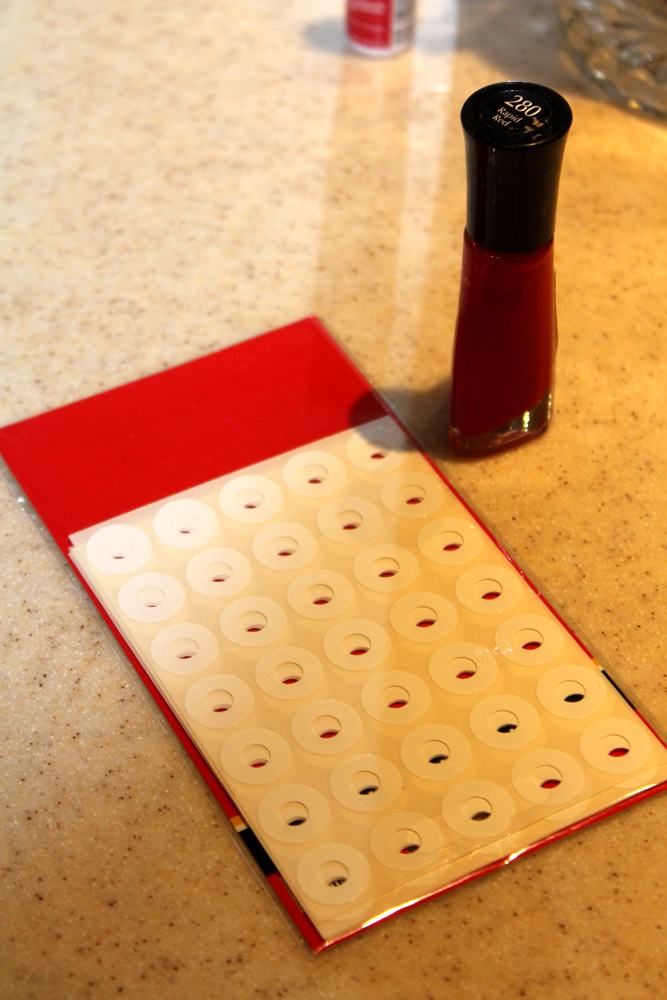
- Prepare for work the base coat, two types of colored varnish, top coat and stencils.
- Apply a base coat (one layer) to nails cleaned of old varnish and previously applied strengthening agents, well filed and having the desired shape and allow it to dry.
- Apply colored varnish - one or two layers and allow the varnish to dry completely.
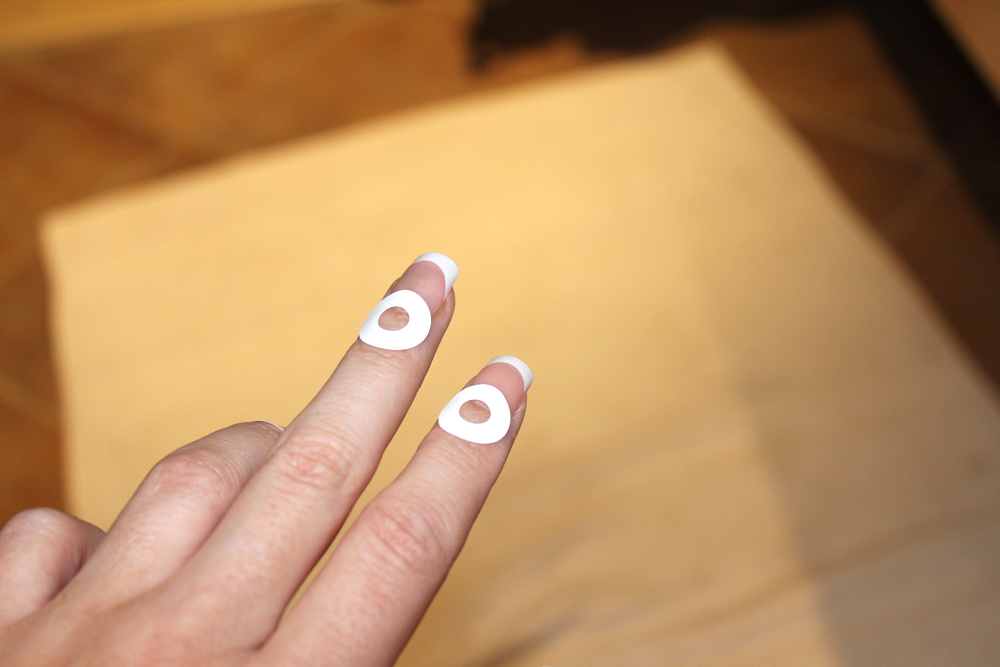
- Depending on the desired nail design, stick a stencil on each nail. You can make an imitation of a natural hole, or you can also make an “inverted jacket” if you stick the stencil not on the base of the nail, but on its end.
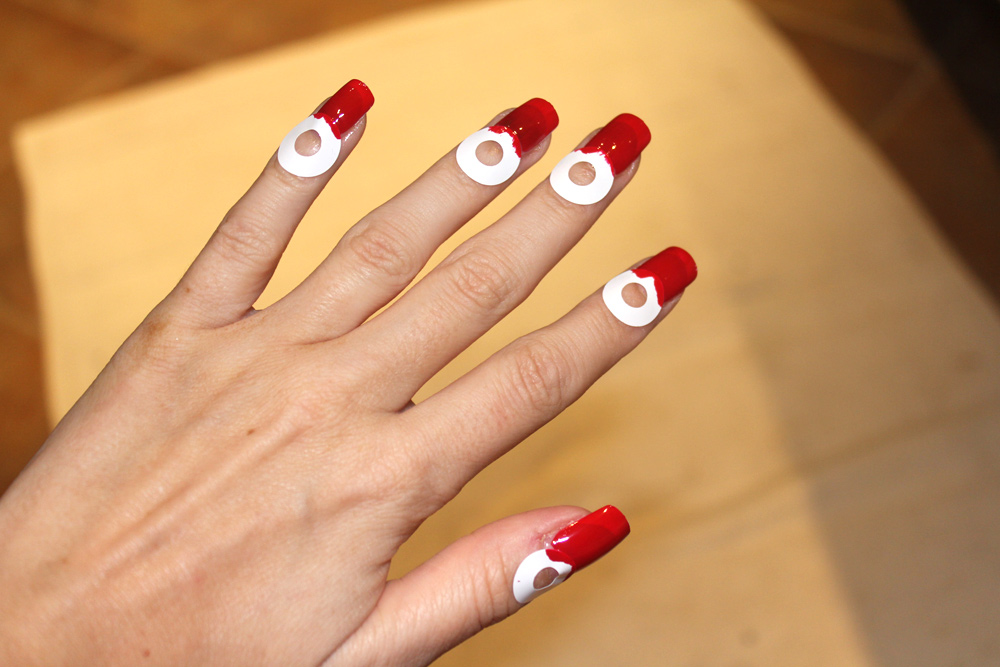
- Apply a second, contrasting varnish to the resulting hole, painting it completely.
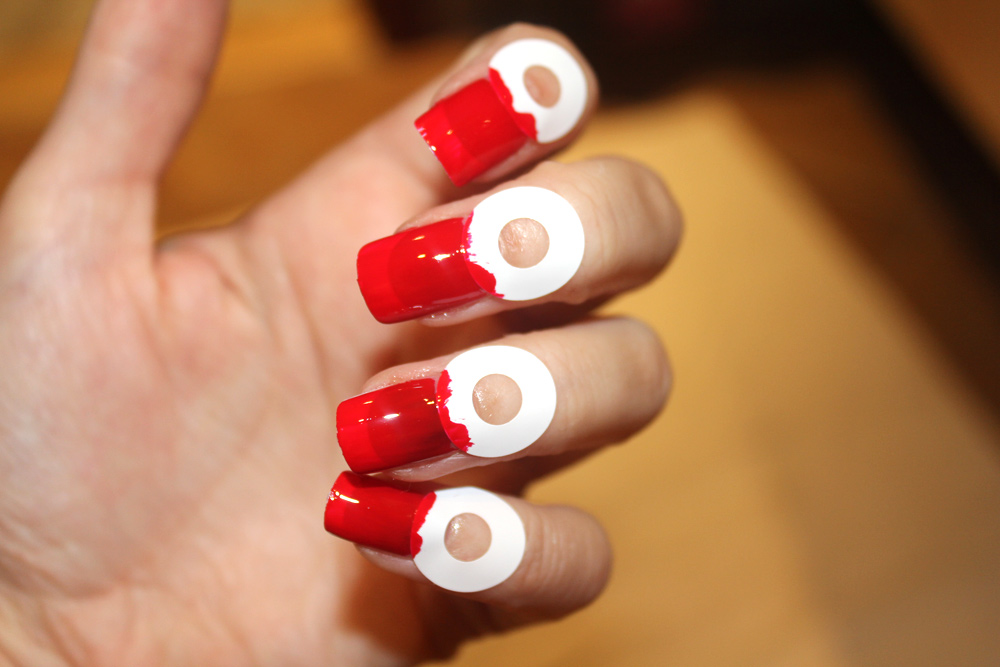
- Let the varnish dry and carefully remove the stencil.
- Coat your nails with top polish and let it dry well.
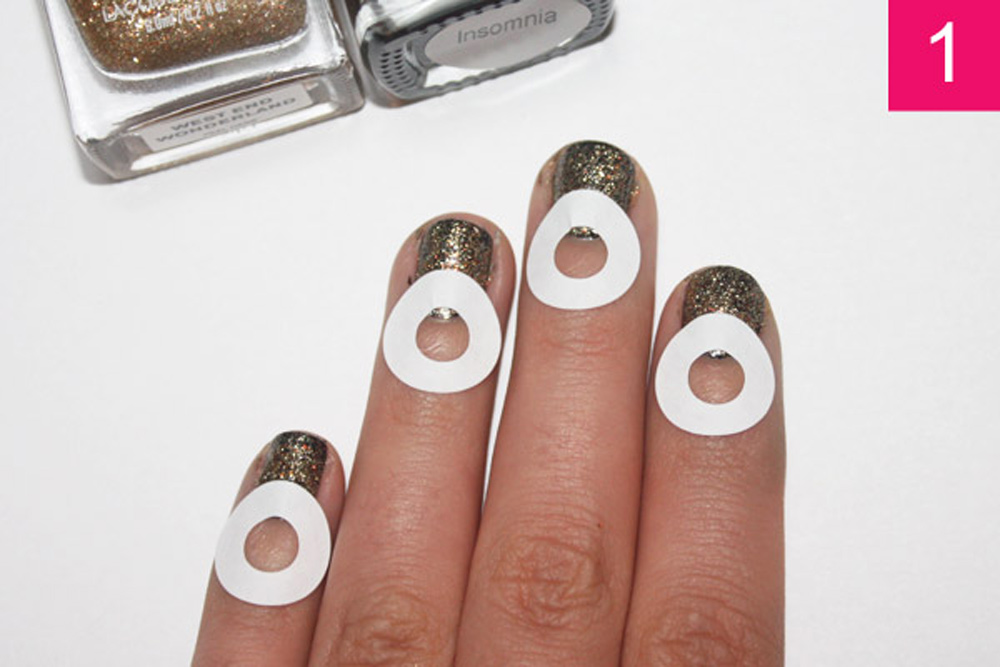
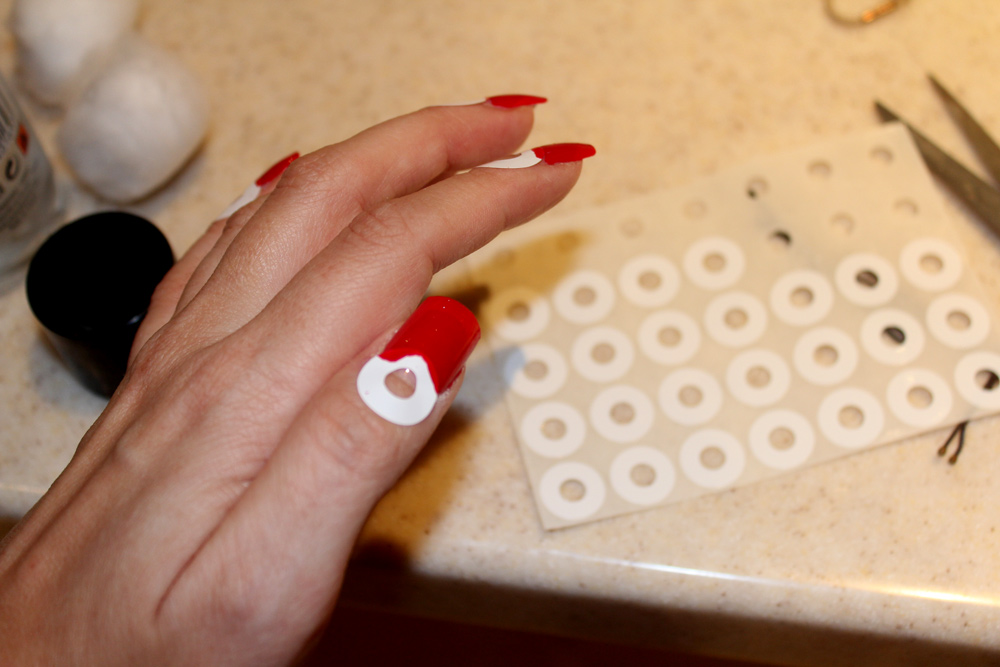
We stick stencils

Applying the second layer

Result
Nail design with colored foil
How to make a trendy moon manicure without a stencil? To do this, you can use, for example, transfer foil. To create a manicure using foil, you will need:
- base coat;
- degreaser;
- gel polish;
- transfer foil;
- adhesive for transfer foil;
- top coat;
- Ultraviolet lamp.
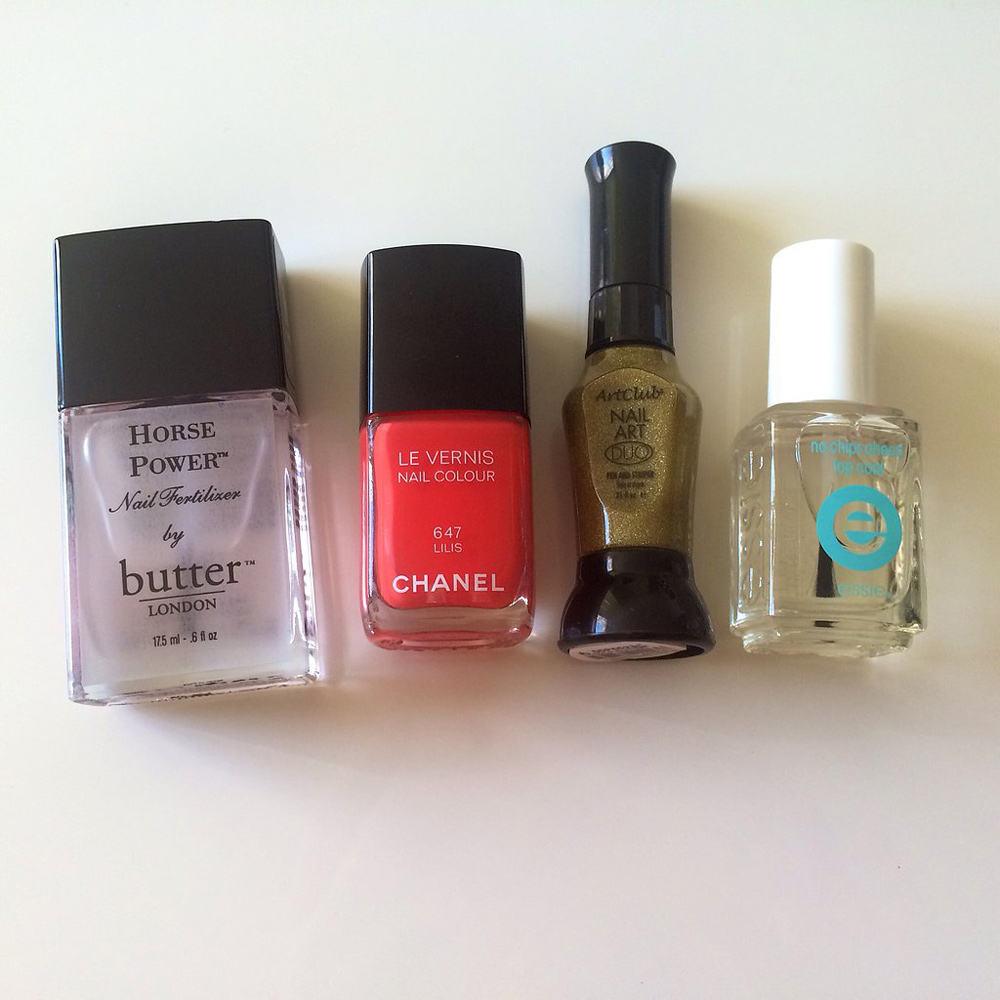
Varnish set
The technique for performing such a jacket with a hole includes the following steps:
- Give nails a comfortable shape, remove old varnish, previously applied strengthening agents and degrease the nail plates.
- Apply one layer of the base composition and dry under a UV lamp.
- Apply 2-3 layers of colored gel polish and also dry under the lamp.
- Paint the nails with a top coat, then dry under the lamp and remove the sticky layer.
- Apply a layer of adhesive for transfer foil on the part of the nail where the crescent will be located, and allow the composition to dry (should become transparent).
- For convenience, cut small squares of foil - approximately the size of the width and length of the nail.
- Put a piece of foil on each nail with the matte side towards the place where the glue is applied.
- Press the foil firmly against the adhesive with your fingers, smooth it out, and then pull the foil off with a jerk.
- A colored strip from the foil should remain on the glue. If it is not there, apply a layer of varnish again, let it dry, then glue the foil and remove it with a sharp movement.
- Apply a top coat for gel polish to your nails or cover them with a regular top coat.
- Let your nails dry well.


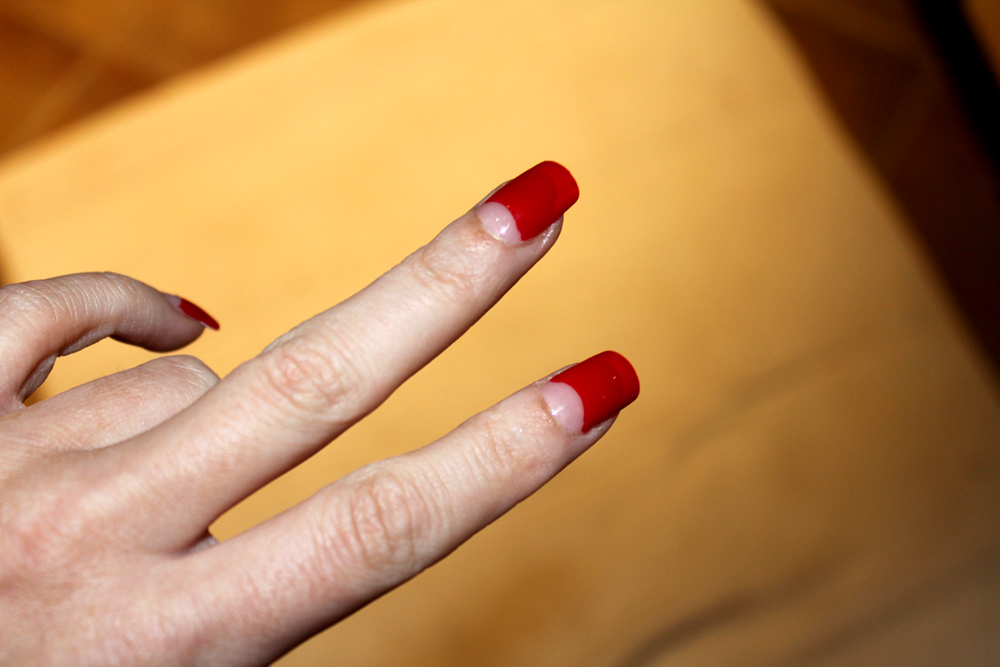
Reverse moon manicure

Lunar manicure design with a brush
For this type of manicure you will need:
- basic composition;
- two types of colored varnish;
- top coat;
- decorating brush.

Tassel for moon jacket
The technique for performing a moon manicure with a brush consists of the following steps:
- Give the nails the desired shape, remove the cuticle (if necessary), old varnish, apply a layer of the base composition on the nails and dry it.
- Apply 1-2 coats of colored base polish on your nails and let it dry well.
- Take the second colored varnish, which will paint the hole on the moon manicure, dip a brush into it for decoration and outline the boundaries of the future crescent.
- Paint over the resulting area of the hole with the same varnish and let it dry.
- Apply a top coat on the nails and allow the nails to dry well again.
Transparent moon manicure
The technique for performing a transparent moon manicure is the same as for the usual decoration of nails in this way, however, instead of one of the colored varnishes, a transparent varnish is used. Instead, you can use the usual base, which is applied under colored varnish. Nails look well-groomed, beautiful and at the same time interesting.


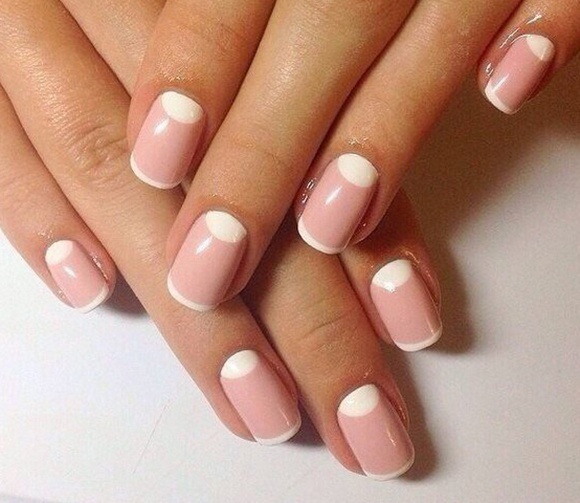
Creating a French Moon Manicure
The Lunar French Manicure is the forerunner of the now popular Reverse Lunar Manicure. The French version of nail coloring differs from the “inverted jacket” by the presence of light, pastel-colored varnishes and white holes. This gives the nails a delicate, neat look, suitable for any look and any event.
The technique for creating such a nail decoration is quite simple: it requires the presence of stencils, a base coat, pink, beige or other light shade varnish, white varnish and a top fixing composition. The hole in the French manicure is located not only at the base of the nail, but also at the tip and has a curved shape, so the stencil should be applied accordingly. After performing a manicure, the nails should be treated with a top composition and allowed to dry.
DIY moon manicure

Not all women and girls have the time and financial ability to visit beauty salons in order to get a moon jacket. How to make a moon manicure at home and is it possible? Yes, it's possible, and it's pretty easy to do.
So, for work you will need: a base coat for varnish, 2 types of colored varnish, a stencil and a fixer. If there are no stencils in the store, you can make them yourself by cutting them out of thick paper. Stages of creating a manicure:
- Clean the nails of the old varnish and products applied earlier, shape the nails with a file and cover them with a base base.
- After the base has dried, apply the colored varnish that will serve as the hole.
- After it dries, apply a stencil to each nail, cover part of the nail with it, apply another colored varnish and let dry.
- After that, remove the stencils from the nails, apply a fixer and also let it dry.

Many fashionistas do not know how to do a moon manicure at home on short nails without a stencil or how to draw a moon manicure with your own hands. Drawing a moon manicure, both for yourself and for someone else, is quite simple: you can use a thin brush and draw a hole on your nails, or apply a transfer foil that is sold in a store.
How to do a moon manicure correctly - French, gel polish, as well as where to see pictures and ideas of a moon manicure, the video instruction will tell in detail or step by step photo. You can find many master classes on the net, where experienced craftsmen will teach beginners how to make a moon jacket manicure, a crescent moon with holes, etc.
The most successful combinations of colored varnishes are:
- moon manicure red and white;
- blue;
- white french;
- black with gold or silver;
- white with purple;
- chocolate and white;
- yellow and orange;
- black and white;
- peach and black;
- beige and black;
- green and yellow, etc. - it all depends on the imagination of the fashionista.
The price of a moon manicure depends on the experience of the master, the cost of varnishes and other means used in the performance of the work. If you decorate your nails yourself at home, then the work will cost much less than in a beauty salon.

Lunar manicure gel polish is a modern fashion tribute to the long tradition of "Hollywood manicure", popular back in the 40s of the twentieth century. With the light hand of the Dior fashion house in 2010, this extraordinary nail design again took top positions in the art of nail art. Let's take a closer look at several ways to make a moon manicure gel polish with your own hands.
Easy to do, but no less original than other nail art ideas, gel moon manicure is a great way to give your nails an unusual look. Fashion trends allow you to show your imagination even in such a design: the hole of the nail bed is decorated with both a standard smile and triangular, rectangular shapes, drawings or decorative elements.
Ways to create moon nail art with gel polish
Method 1. Use a stencil
In order to make a moon manicure with gel polish, we need: a base, two contrasting shades of gel polish, a fixative, stencils, and a UV lamp. You can either buy stencils in the free market or prepare them yourself.

- We remove the remnants of varnish from the nail plate.
- We steam our hands in a bath with essential oils and sea salt.
- We process the cuticle with an emollient. Remove excess with nail scissors or tongs.
- We file the nails, giving them the desired shape.
- We apply moisturizer. We do self-massage of the palms.
- We carefully process nail plate degreasing agent.
- We apply the base on the nails, dry it in a UV lamp.
- We cover them with that shade of varnish, which will be a moon accent. Dry in a UV lamp. Each new layer of varnish is carefully dried with a lamp.
- We cover the area that will remain unpainted with a stencil, and apply the main color. Removing stencils. Dry in a UV lamp.
- We apply a binder.
- We enjoy the result.

Method 2. Use a brush
Lunar manicure with gel polish using a brush suggests a standard scheme for completing the previous instructions for steps 1-7. Next, we work in this way:
- We apply the main color of the manicure on the nails, carefully drying each layer with a lamp.
- Using a brush, draw holes at the base of the nail bed with a second, contrasting color. Dry in a UV lamp. To create a pattern on the nails, it is convenient to use an eyeliner brush with a long soft pile.
- We apply a fixer and enjoy the result.

Method 3. Use foil
Such a moon gel manicure will be a bright accent of your image. Contrasting combinations of dark lacquer and shiny foil always attract attention. To create such nail art, we repeat steps 1-7 step by step. Further:
- We cover the nails with the main color. We apply the required number of layers, drying each in a UV lamp.
- The area of \u200b\u200bthe nail hole is carefully drawn with a brush with glue for foil. Let the glue dry.
- Apply with transfer foil matte area down to the treated area. Let's dry. Sharply remove excess foil from the nail.
- In the event that the foil is unevenly printed on the nails, we again apply glue to this area and repeat the familiar steps.
- We cover the nails with a fixative.
Lunar gel manicure at home is a great way to give your nails bright accents. For those who have all the necessary equipment, do it yourself stylish design will not be difficult. In addition, such nail art remains on the nails much longer, without losing the brightness of colors and its original appearance. The simplicity of execution allows you to vary the design, come up with extraordinary patterns and ways to decorate moon nail art. To change the palette, you only need nail polish remover and a new shade in your color scheme. Do not be afraid to experiment - nail design is limited only by your imagination!
Video: moon manicure gel polish
The fashion world does not stand still, but is rapidly moving forward in big and small steps. The fashion for clothes, hairstyles, hair coloring is rapidly changing. Even the fashion for manicure changes almost every day.
Today, an elegant French manicure is in fashion, tomorrow a contrasting gradient on the nails is in fashion, the day after tomorrow something else will be in fashion. And these trends need to be taken into account not only by manicure masters, but also by their clients. Firstly, in order not to look old-fashioned, and secondly, it is always nice to be one of the first to try something new.
 Very unusual manicure - a fashion trend
 What is the name of a manicure with a hole?
In fact, a moon manicure or a manicure with holes is a kind of alternative version of the familiar French manicure (French). French - this is when the top of the nail is highlighted with a varnish of a different color from the main color of the nail.
The traditional version uses flesh-colored varnish, white and transparent.

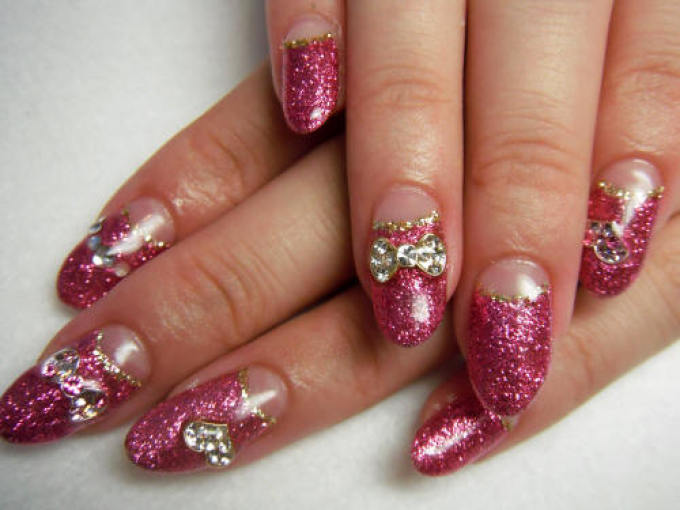
A more modern version implies the presence of more contrasting colors, additional patterns, gradients, rhinestones, sparkles.
 french manicure with rhinestones
Manicure with holes - highlighting the nail hole from below with a different color, rhinestones, sparkles, whatever.
So, the main difference between a real jacket and a moon manicure is that a jacket means highlighting the nail from above, and moon manicure - from below.
 traditional moon manicure
Sometimes masters do not use semicircular holes, but triangular ones. Manicure is stylish and unusual.
Some masters, at the request of clients, can combine a moon manicure and a jacket. Then a very beautiful, fashionable, combined manicure is born. In such a manicure, you can add rhinestones, patterns and sparkles. But you need to know the measure, since the abundance of small details greatly disperses attention.

How to make a moon manicure at home: step by step instructions
Making a moon manicure “like on the cover of a magazine” is not at all difficult. But such a manicure will require some accuracy and understanding of the basic principles of creating a spectacular manicure from you.
Even if you are a complete beginner, creating such a manicure will not be difficult if you follow all the tips below.
So, what is required to create a manicure with holes
- nail file
- a few cotton sponges
- orange nail stick
- nail polish remover
- pre-manicure finger pretreatment or something greasy so that the varnish can be easily wiped off the finger
- two colored varnishes and a colorless varnish to fix the work
- special stencil (circle with a hole inside)
- patience
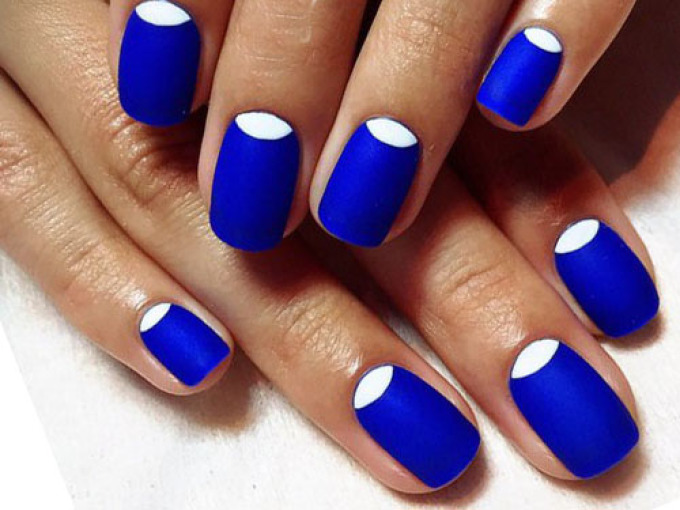
If you do everything right, you will end up with such a manicure.

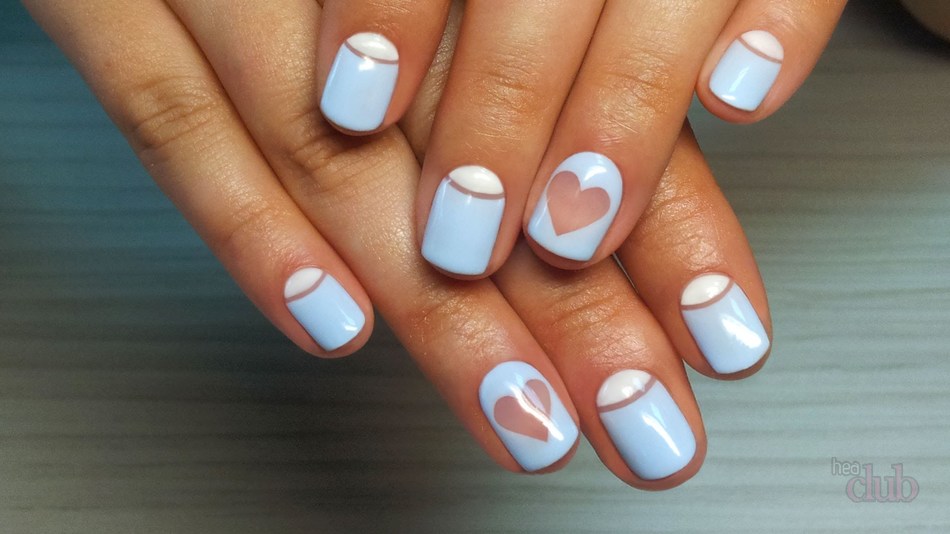
Now the technology for creating a blue moon manicure:
- Process the nail. With the help of a nail file, make the shape of your nail perfect, and with the help of an orange stick, push back the cuticle, degrease the nail plate and apply the base under the varnish. Treat the finger near the nail with a special mixture so that the varnish that accidentally gets on the skin can be easily removed
- Apply an even coat of base coat to the prepared nail. In our case, it is white varnish
- Now you need to apply a stencil, slightly stepping over the base of the nail to make a crescent
- With a varnish of a different color (in our case, blue), cover the part of the nail that remains without a stencil
- Fix the resulting manicure with a layer of colorless varnish
Advice! Apply a new layer of varnish only after the previous layer of varnish has completely dried. Otherwise, the varnish will be covered with bubbles or simply will not dry out, and your efforts will be in vain.
This is the easiest version of the moon manicure. If desired, you can use other colors of varnish.


How to evenly draw holes on nails with gel polish or shellac?
Drawing an even pattern on nails is a whole art that requires maximum concentration from the master. The exception is if a stencil is used. There is enough precision.
But the hole on the nails must have a perfect shape, otherwise the manicure will look cheap and sloppy. If you do not need such an effect, arm yourself with a brush, gel polish and a lamp and go!
In order for a manicure with holes using gel polish and shellac to come out “as it should”, prepare:
- two gel polishes, contrasting in color
- base for gel polish
- brush thin
- UV lamp
- stencils for french manicure

Now the fun part - what are the ways to draw the perfect hole on the nail?
Method 1:
- Apply the contour of the future hole with a very thin brush
- Paint the hole in 2 layers, drying each layer for 2-3 minutes
- Then apply a color coating above the hole, reaching the border with it, and do the same with it
Method 2:
- Apply colored gel polish to the entire nail, dry well
- On a dried layer of gel polish, draw a hole with a brush, fill the borders of the hole at the base with a varnish of a different color, dry
- Finish the manicure with gel polish, seal the coating
Method 3:
- Mark a place for a future hole
- Apply colored gel polish to the entire nail, be sure to dry it. It is advisable to make two layers
- Apply a varnish of a different color to the hole, dry. Make two layers
- Finish the manicure with gel polish, seal the coating
These were the main ways to create a perfectly even hole using gel polish and shellac. Above was a method for creating a moon manicure using a stencil. This method is also suitable for any type of varnish, not just ordinary.
How to evenly draw a hole on the nails with acrylic paint?
The technique of applying a hole with acrylic paints does not differ from the technique of applying a pattern with gel varnish or ordinary varnish.
To implement the idea of creating a moon acrylic manicure, prepare:
- brush
- base lacquer, lacquer base, colorless lacquer
- dots (or regular needle), possibly a toothpick
- cotton pads
- nail polish remover
- acrylic paints

To make a moon manicure with acrylic paints, follow the instructions:
- Prepare your nails: shape them, push back the cuticle, degrease the nail plate.
- Apply a coat of base polish and base color polish, let it dry.
- Now, with a thin brush, pick up acrylic paint of the desired color, outline the boundaries of the future hole, fill the hole with paint.
- Now an optional step: with the help of a dots or a needle, you can make absolutely any pattern on the nails, in addition to holes - monograms, flowers, butterflies.
- After the paint has dried, apply a coat of clear varnish to seal the work. This step is required.

That's all. Manicure with holes using acrylic paints ready! Such a manicure will not last as long as gel polish, but it is still worth a try.
How to draw a moon manicure evenly with ordinary varnish?
The easiest way to draw holes with ordinary varnish is a stencil. This method was described in detail above, so it makes no sense to write about it again.
Advice! If you don't have a French manicure stencil, you can make your own using cardboard and tape, or use regular duct tape, masking tape, or plastic-coated plaster.
Creating a moon manicure using a special French stencil.
Lunar manicure with homemade stickers with ordinary varnish.


Lunar manicure with shellac using a stencil
Shellac is a type of gel polish that combines the properties of gel and regular polish. Applying and removing shellac is as easy as regular polish.
Unfortunately, there are no special secrets and secrets for creating a moon manicure with shellac. There is a proven scheme for applying shellac, which you need to take as a basis and stick to it throughout the creation of a manicure with holes.
- Give the nail the necessary shape, prepare it for shellac coating, after degreasing it
- Apply shellac to the nail plate
- Fix a layer of shellac
- Manicure ready
In just 5 steps, you can create a moon manicure with shellac. This is much faster than using gel polish, because the latter must be dried after each applied layer. Shellac does not require such an attitude.
How to make a manicure with triangular holes?
A manicure with triangular holes is done a little differently than a manicure with crescent-shaped holes. Nevertheless, even in this design, the moon manicure is quite simple and almost anyone can do it.

So, to create a lunar triangular manicure, you will need:
- Two varnishes of different colors and one colorless varnish
- Nail polish remover, cotton swab
- Two strips of adhesive tape, adhesive tape, adhesive tape, electrical tape (optional)
- Nail file and orange stick for shaping the nail
- Time and patience
Step by step description of the process itself:
- Prepare the nail for applying varnish: file the nail plate, remove or push back the cuticle using an orange or cotton swab for this procedure, degrease the nail with a primer or regular nail polish remover.
- Apply a base coat of the color you would like to see in the area of the hole.
- Now cut out thin strips of adhesive tape, glue them in a triangle, as shown in the diagram below.
- Paint over the part of the nail that is not covered with stripes with varnish of a different color. Let the varnish dry. Then remove the adhesive tape.
- Fix the manicure with a small layer of colorless varnish.

How to evenly draw a moon manicure with a transparent hole on short nails?
The very first version of the moon manicure was just the same with a transparent hole. Later, women began to come up with ways to make holes in different colors, because it looks new.
Let's return to the very first option - a moon manicure with a colorless (transparent) hole. To create such a manicure perfectly smooth, you will need:
- stencil
- nail polish remover, cotton wool or cotton pads
- colorless varnish and colored varnish (one bottle each)
- nail file and orange stick
Process:
- Prepare your nails: shape them, degrease and remove the cuticle.
- Apply a coat of colorless varnish, let it dry completely.
- Now attach a stencil to the base of the nail, this is the future hole. Paint over everything above the stencil with colored varnish. Let the polish dry completely.
- Now apply another coat of colorless varnish.
- Ready! A classic moon manicure with a transparent hole will delight you for a long time!

How to draw double holes in a moon manicure with a transparent strip?
Lunar manicure with a transparent strip - a closer version of the classics of all existing species moon manicure.
For such a manicure, it will take significantly more time than for a standard one, because the hole will have to be drawn as much as twice.
The set of materials you will need to create a moon manicure with a transparent strip includes:
- orange stick, cotton pad, nail file
- nail polish remover, sponge
- two colored varnishes and one colorless varnish
- stencils for french manicure with thin inner borders, the more stencils the better
Now about how to create a manicure with transparent holes:
- Give the nail plate the desired shape with a nail file, remove the cuticle.
- Now degrease the nail with a special tool or nail polish remover.
- Apply colorless varnish to the entire nail, let it dry.
- Now attach the stencil so that it ends where the hole will begin.
- Paint over the upper area with the first colored varnish (where the edge of the nail is).
- Paint over the area of the hole with the second varnish (if desired, you can use only one varnish).
- Now let each lacquer dry and seal the coat with a thin coat of colorless lacquer.

Take note! Very often there are manicure options in which a transparent strip is filled with rhinestones or sparkles. In such a case, it is not necessary to apply the method just described above. You can do a regular manicure with holes, and apply rhinestones or sparkles to the border of the hole.
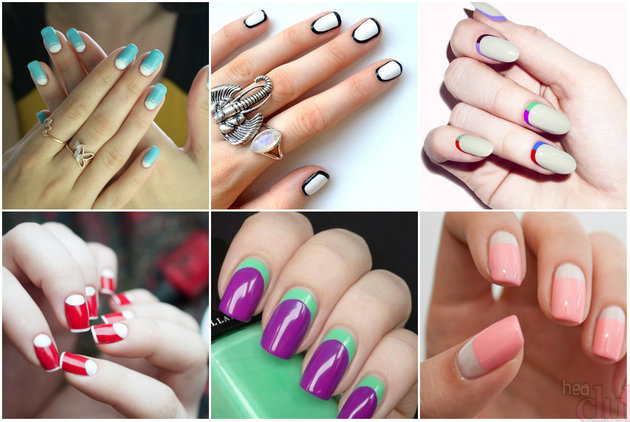
Lunar manicure ideas: photo
The article does not describe all options for a moon manicure, but only the simplest ones. More complex manicure options with holes are shown below.
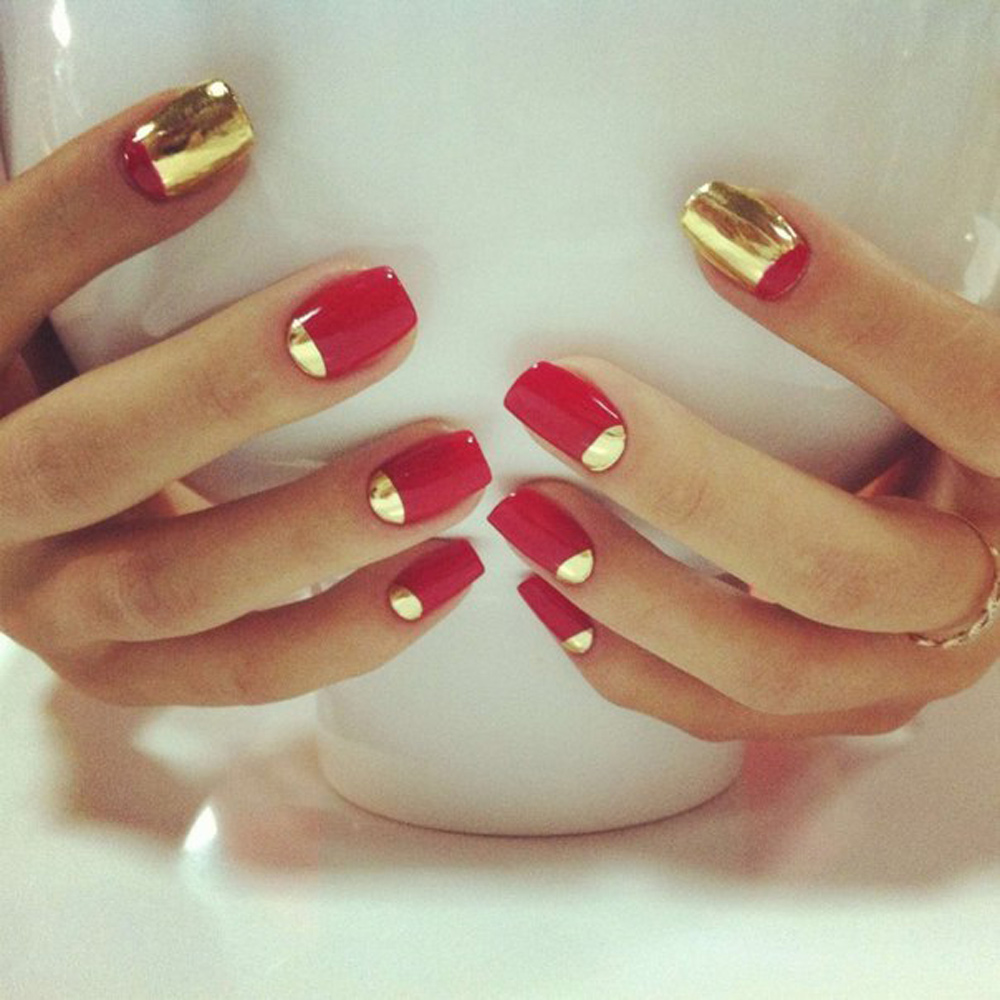
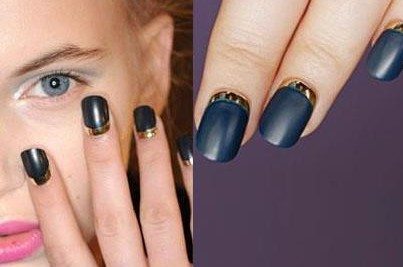
Black and gold colors are a great holiday or weekend combination. The black color is strict, it is perfectly complemented by golden play of sparkles.

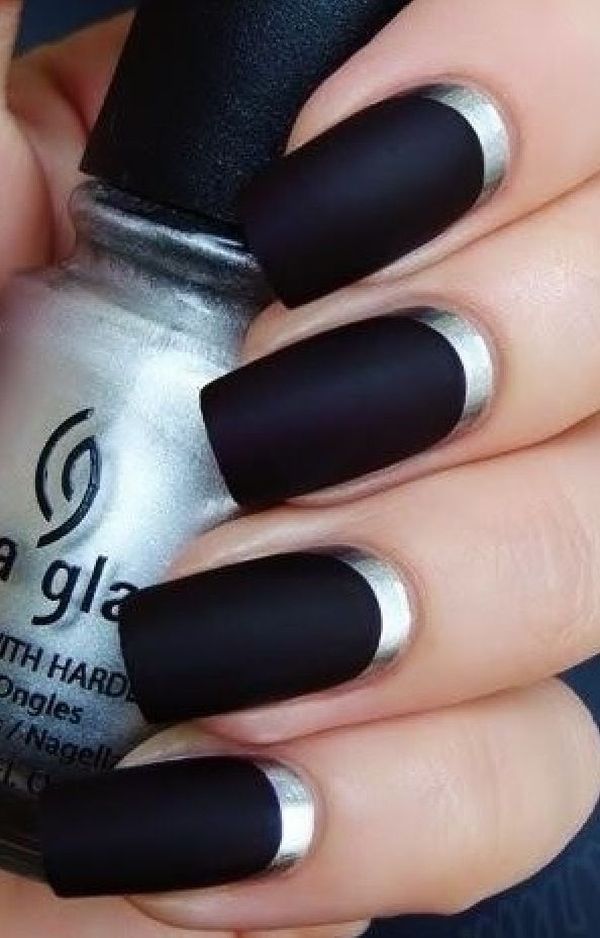
A few years ago, a trend appeared - a combination of matte varnish with metallic elements, which were used as foil or a special varnish with a metallic effect.
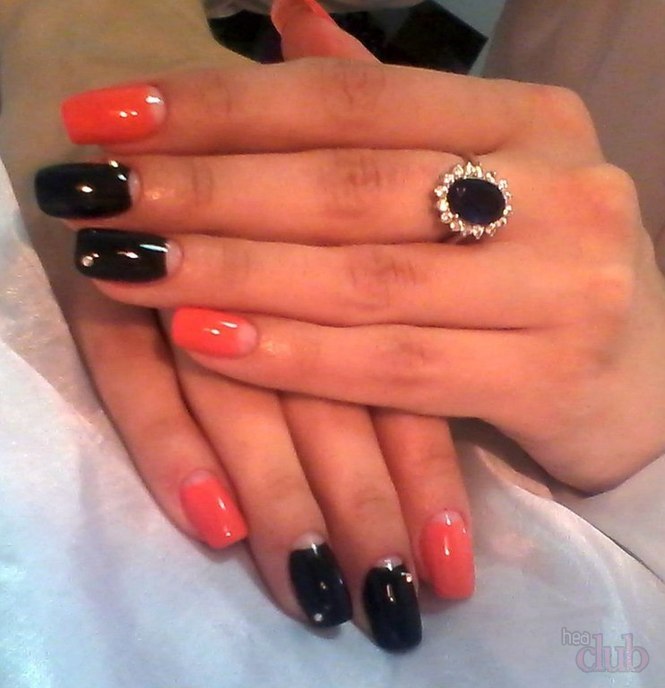
Black nails with colored holes are still in fashion.


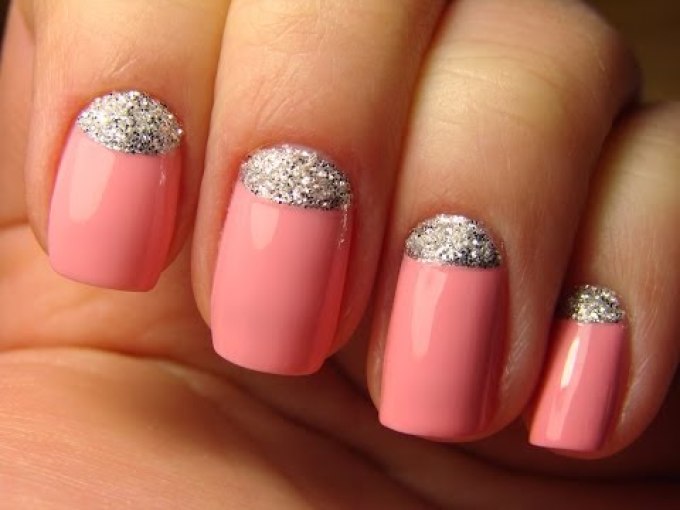
A gentle moon manicure with sparkles or a reverse French manicure is a solution for a manicure for every day.


If you definitely want variety, pay attention to the polka dot moon manicure.

A bright solution - a manicure with holes in blue, pink, green and yellow colors will definitely attract attention to you.


Technology for performing moon manicure with shellac. Lunar nail design ideas.
Lunar manicure has been at the peak of popularity for quite a long time. This nail design is very simple and, best of all, it will allow a woman to show her imagination.
Each girl can decide for herself whether the moon nail art will be made in a classic style or rhinestones, sparkles, stickers and beautiful drawings will also be present on her nails.
Lunar manicure technology:
- First, remove the old decorative coating, and then give the nails a beautiful oval shape.
- Treat your nails with a degreaser and apply a base coat on them
- Hold your fingers under a special lamp for literally 40 seconds and proceed to apply the main decorative layer
- Paint your nails with colored gel polish or shellac in two layers
- Be sure to dry each layer separately under a UV lamp.
- Then, take a decorative coating of a different color and use a brush to paint the base of the nail plate
- This layer also needs to be dried under the lamp.
- Apply a fixer, dry it, and then wipe the nails with an alcohol wipe (this will help remove the sticky layer)
Lunar manicure with rhinestones
Rhinestone Design Ideas
Nail design with rhinestones always looks very festive and bright. Depending on how bright you want to get your nails, they need to decorate either one finger or all at once.
If you plan to stick them on all fingers, then place them along the very edge of the picture at the base of the nail. If you want the moon manicure to be more restrained, then decorate only one finger, for example, the ring finger.
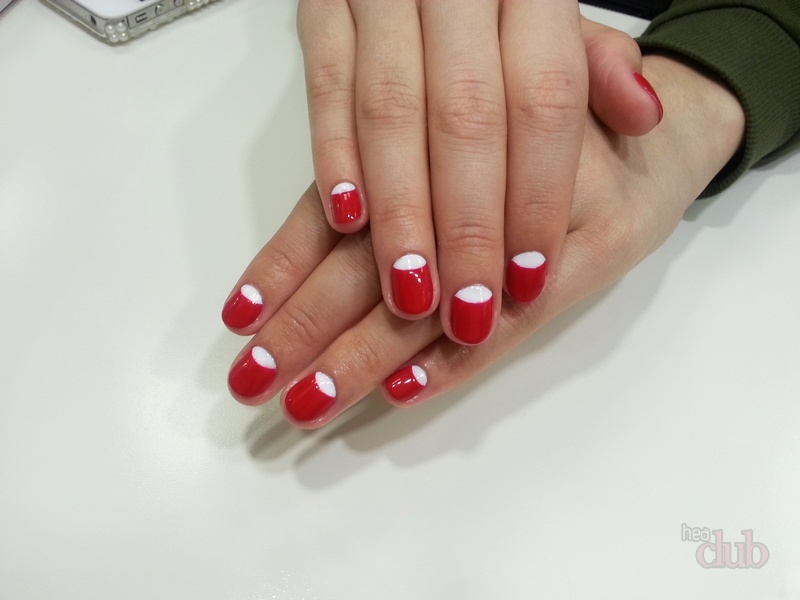
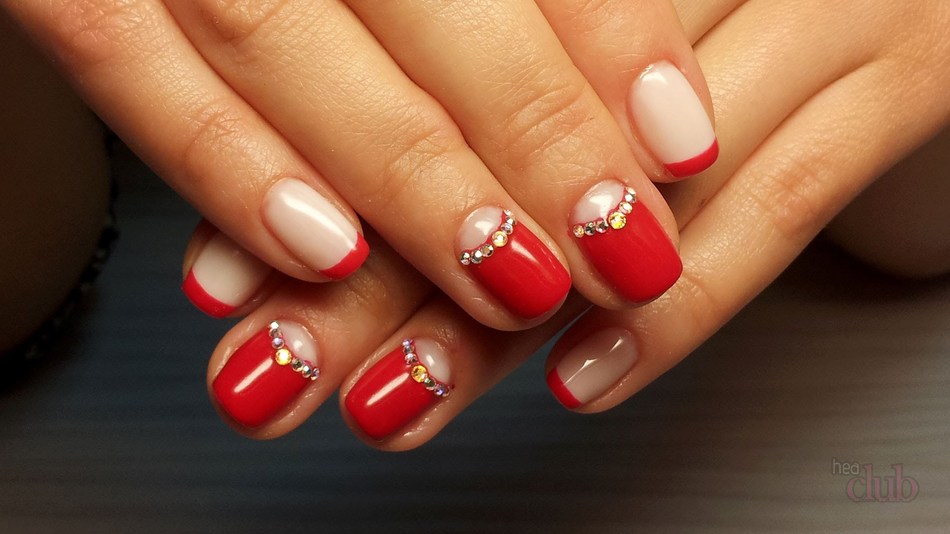
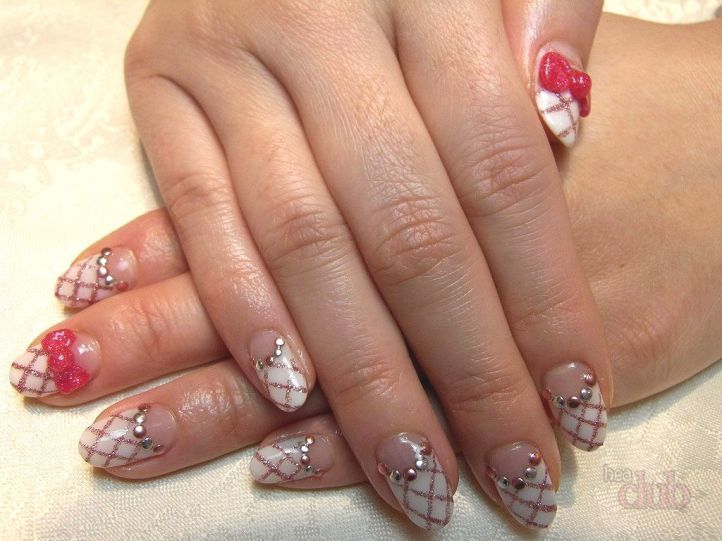
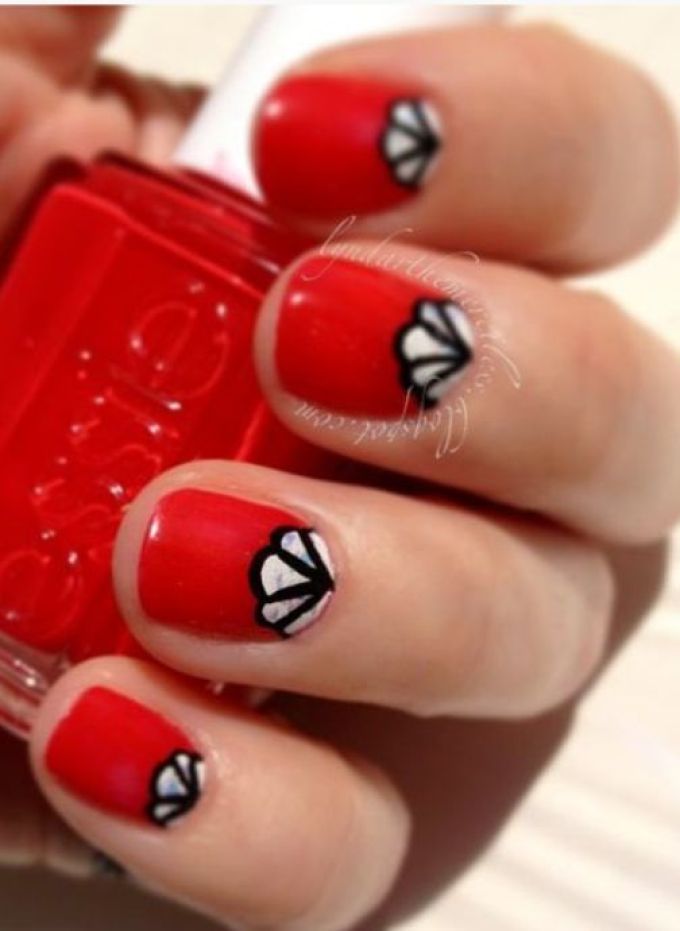
Red moon manicure with rhinestones
 Bright nail art with rhinestones
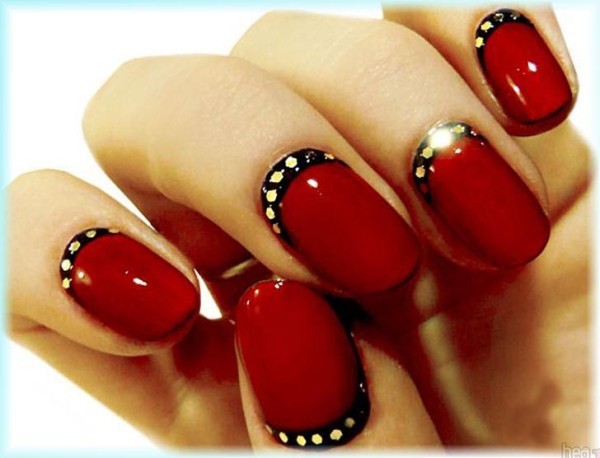
The red color is very bright in itself, so the presence of rhinestones on such a manicure would be appropriate only for celebrations and evening receptions. In this case, you can also try to make a bright border on the color transition line. And if it seems to you that such a design does not look very festive, then lay out a semicircle with rhinestones at the base of the nail plate.
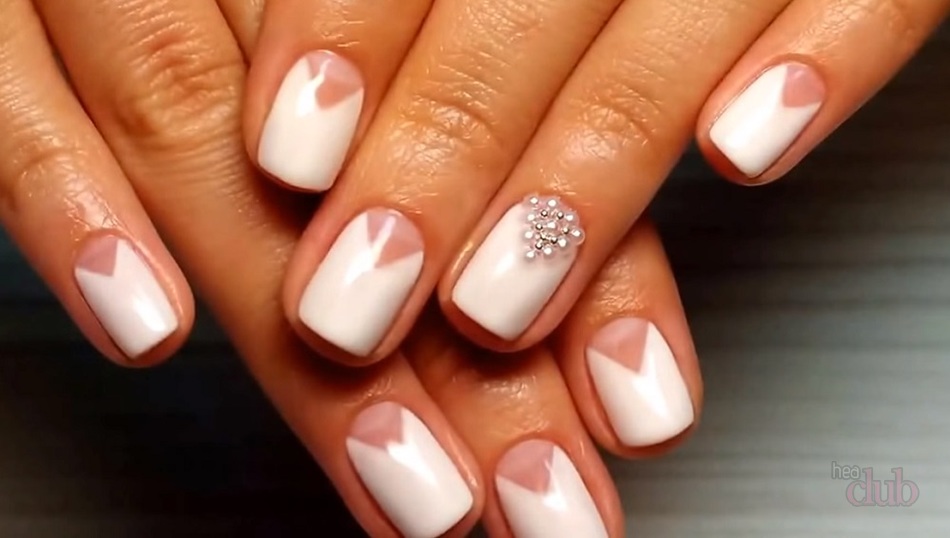
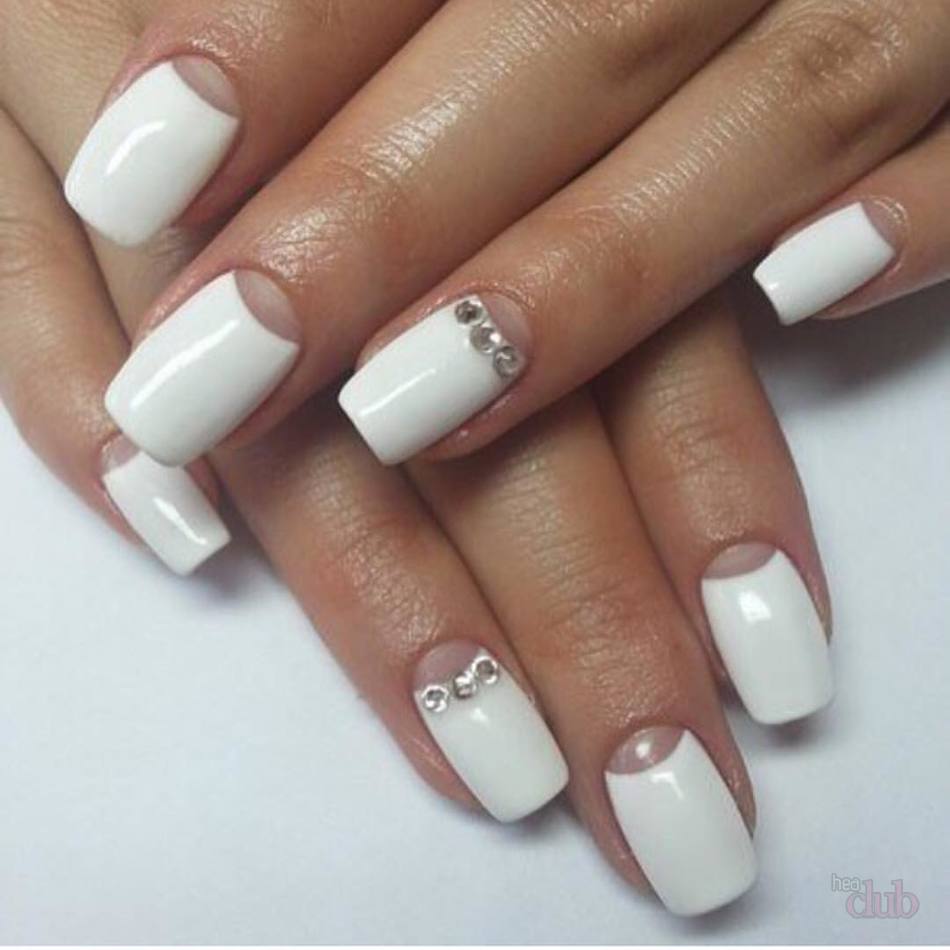
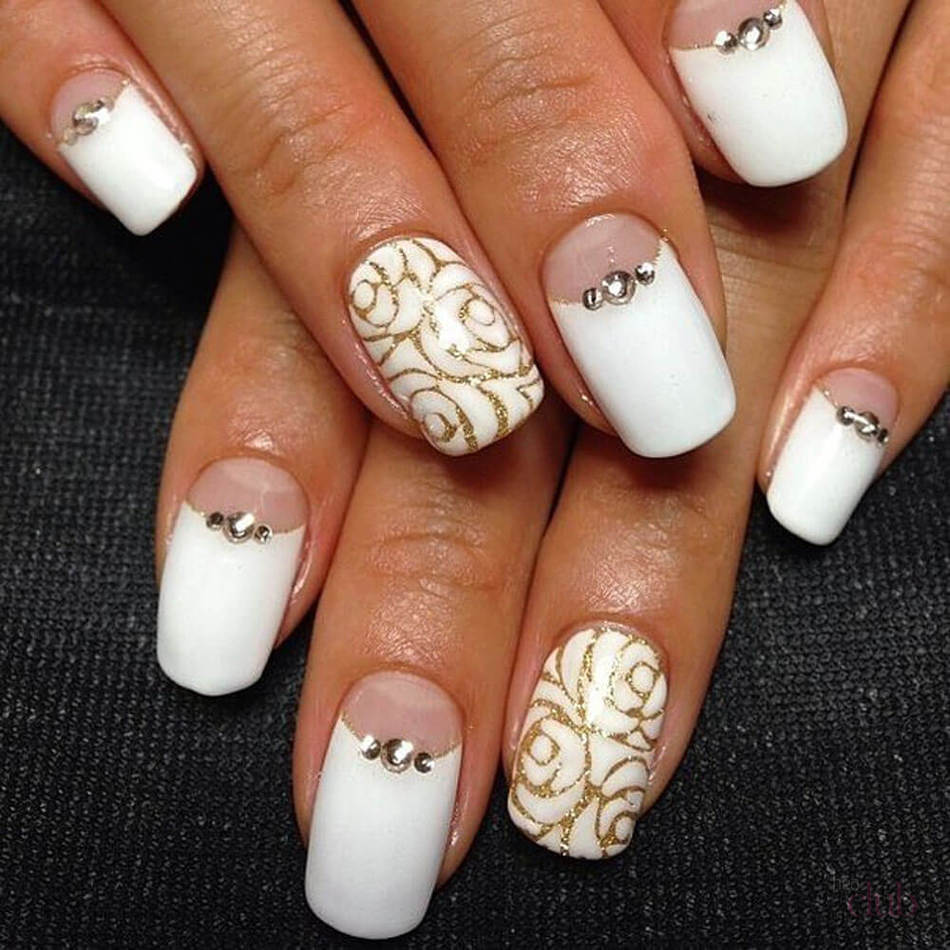
White moon manicure with rhinestones
 white nails photo
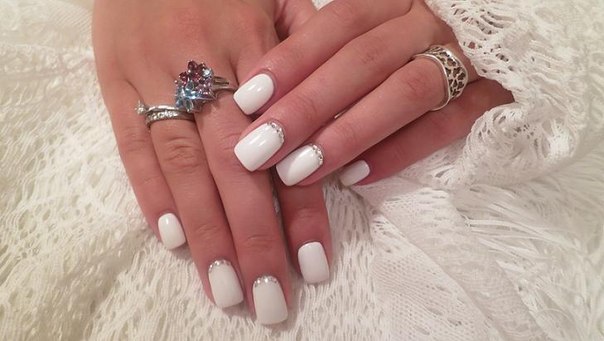
This nail design is most suitable for a wedding manicure. It turns out gentle, refined and very solemn. In this case, you can use rhinestones of different sizes and create beautiful drawings with their help.
Lunar manicure for short nails
 Short nail design
This design looks very beautiful on short nails. But since voluminous drawings will visually reduce the length of the nail, it would be better if you give preference to the classic jacket. If you want brightness, then achieve it using contrasting varnishes.
Lunar and french manicure together
 Lunar French manicure
If you decide to use both a moon and a French jacket to decorate your fingers, then be sure to ensure that the so-called smiles at the base and at the tip of the nail are exactly parallel to each other. If they differ too much in size or shape, then your hands will not look very aesthetically pleasing.
Lunar manicure with a pattern
 Delicate drawings on the nails
Nail art with shellac, like all other decorative tools, can be decorated with drawings. If you have minimal skills, then you can try to create an original painting yourself.
And those ladies who are not confident in their abilities can use special stencils to create a beautiful design. Such a drawing will look no worse than man-made, but it will not take you too much time.
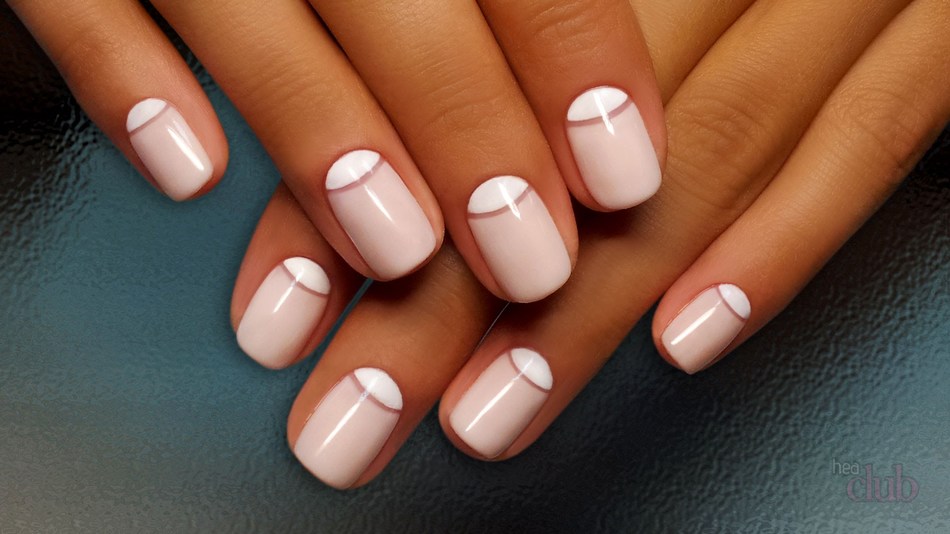
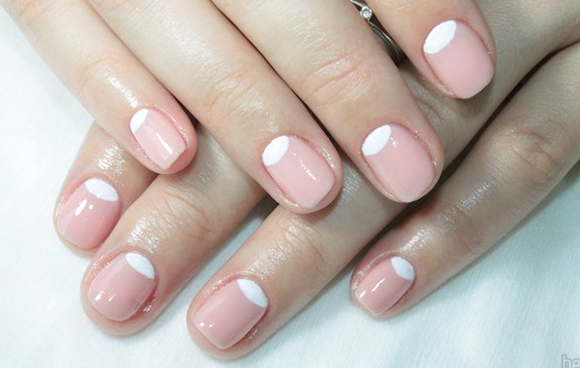
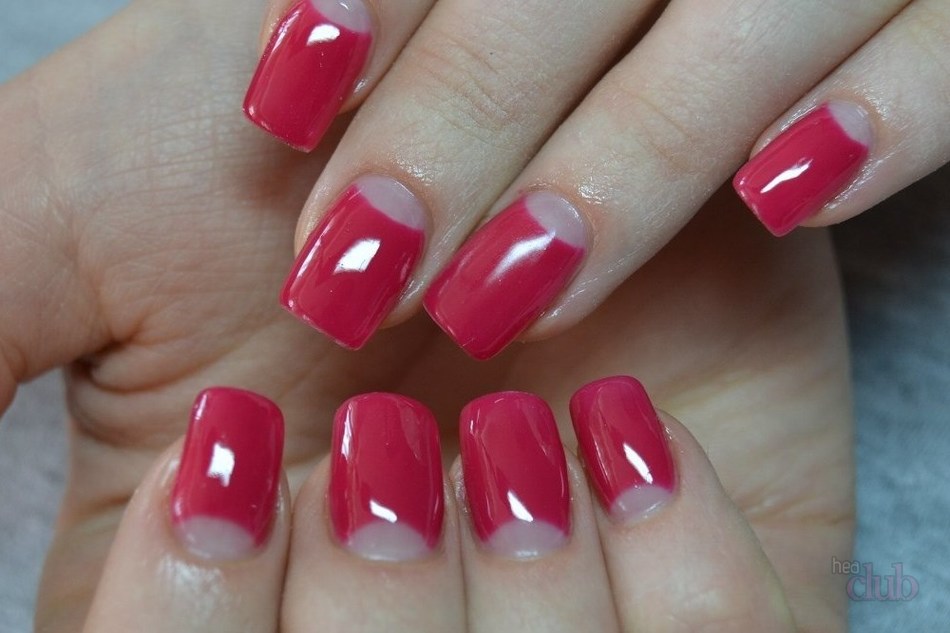
Lunar manicure with a transparent hole
 Feminine pink nail art
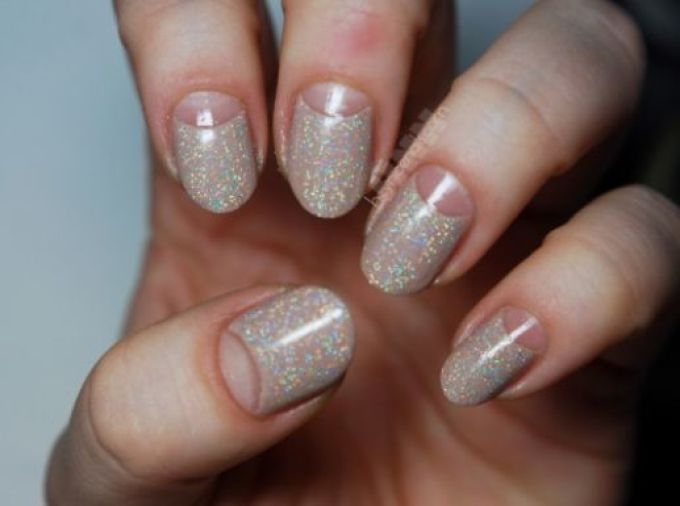

This design is good because in this case you will not have to worry about how well the different colors of the decorative coating combine with each other. If you wish, you can leave the hole, generally not painted over, or treat this place with a colorless varnish. To create this delicate nail art, it is best to use special stencils that will help create the correct shape of the transparent part of the nail.
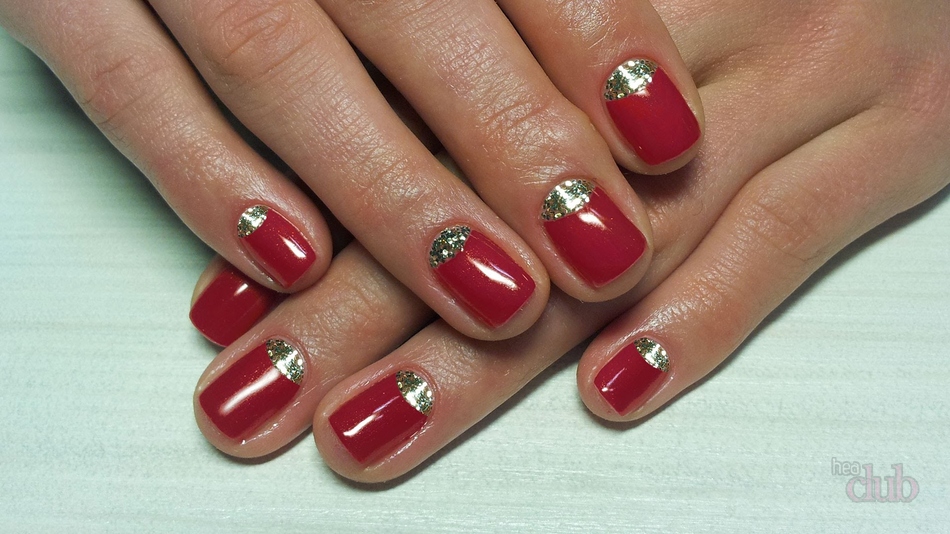
Lunar glitter manicure
 Glitter manicure design

Nails decorated with sparkles always look very bright and attractive. But so this brilliant beauty will be combined with a moon manicure, it must be taken into account that such a design can very much hide the length of the nail plate. In view of this, if your nails are of medium length, then make the hole at the base as thin as possible.
Lunar summer manicure
 Fashion summer design
Summer nail design can be as bright as possible. If desired, you can use very contrasting color combinations and even acid shades. But if you do not want to look ridiculous, always remember that you do not need to decorate a bright varnish with rhinestones and sparkles. Such a manicure will look original and without additional decoration.
Moon manicure stickers
 Do-it-yourself nail design at home

If you are making an inverted jacket for the first time, then be sure to use special stickers to create it. They will help you make the right hole the first time and you just have to choose the right decor for your nails.
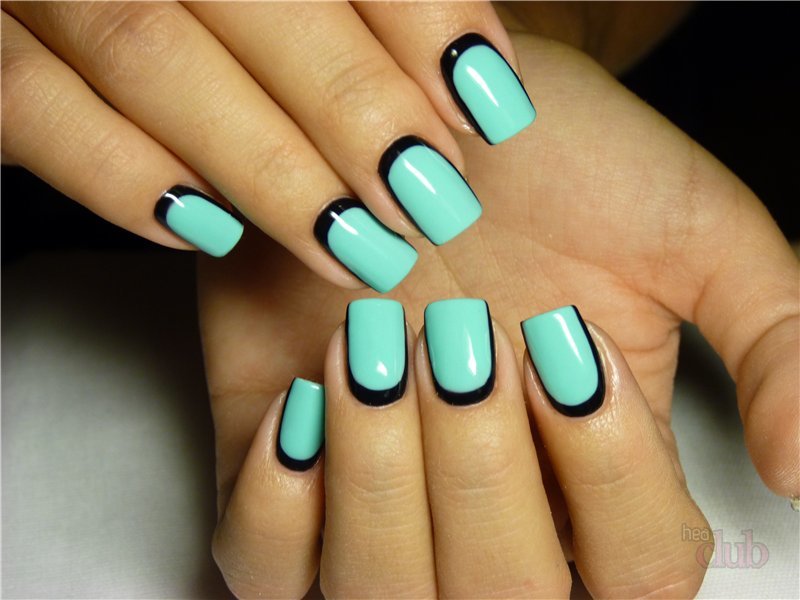
Mint moon manicure
 Mint Design Ideas
If you do not like bright overloaded nail designs, then mint manicure will definitely appeal to you. In this case, your hands will look very gentle, natural, but very original. To create such a design, it is best to use a decorative coating of white and mint. And if you want the transition between colors to be minimal, then use two different shades of mint.
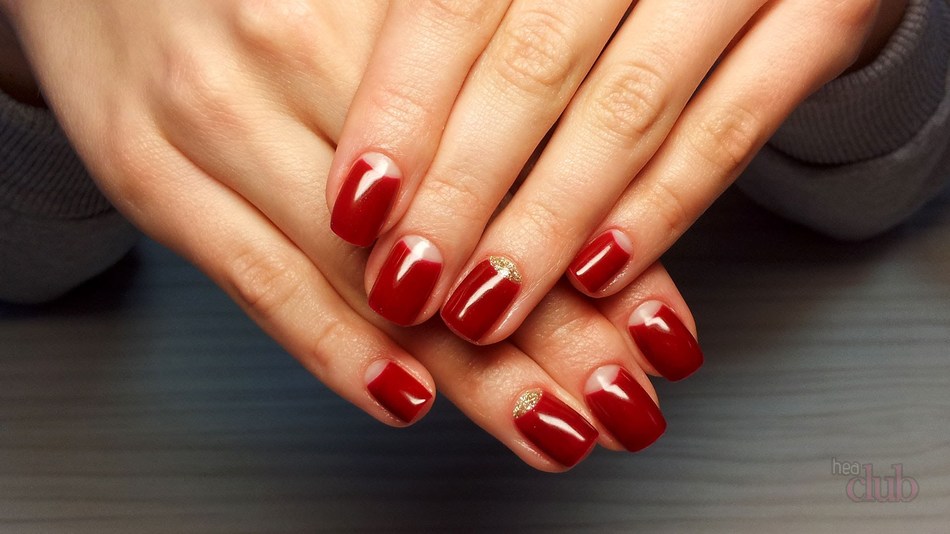
Lunar manicure red and white
 The perfect combination of red and white

Red in combination with white always gives a very good result, so a moon manicure made in such a color scheme always attracts attention quite strongly. In this case, you can try to play with shades of red and use, for example, scarlet or purple.
Although this combination is taught to be very contrasting, with just a few movements you can make it less aggressive. Try to apply neat spots, curls and lines on the red part of the nail, and your hands will immediately look softer and calmer.
Spring moon manicure
 spring marigolds
In the spring of next year, bright colors will return to fashion. Therefore, with the advent of heat, you can forget about all the pastel colors and use bright juicy shades to create spring nail art. All this beauty can be complemented with rhinestones, sparkles, silver ribbons and beautiful and delicate patterns.
Matte moon manicure
 Matte nail art
Matte design is considered ideal for Everyday life. Such a manicure turns out to be strict, beautiful and elegant at the same time. But you do not have to use exclusively to decorate your fingers. matte shellac. You can quite easily paint over the nail plate with matte varnish, and make the characteristic hole located at the base of the nail plate glossy.
Beige moon manicure
 Beige design on oval nails
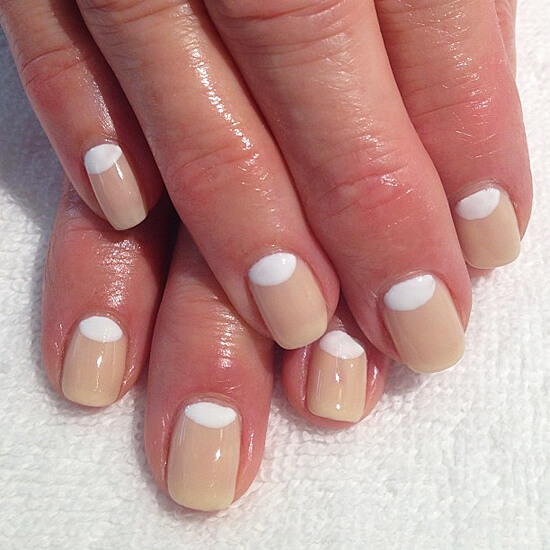

Beige is often used to create an inverted jacket. It is usually combined with white, golden, coffee and light brown shades. Since such a design turns out to be quite calm, women try to add colors to it with brighter shades. To do this, they cover the nail with a beige gel polish, and the main ones are painted over with an orange, blue or even black coating.
Lunar manicure purple
 purple nail art

Violet color is particularly aristocratic, so the design in this color is especially beautiful and bright. Best of all, this color scheme is combined with pink, purple and black. But if you are not afraid to look extravagant, then you can complement it with a green, mint or bottle shade.
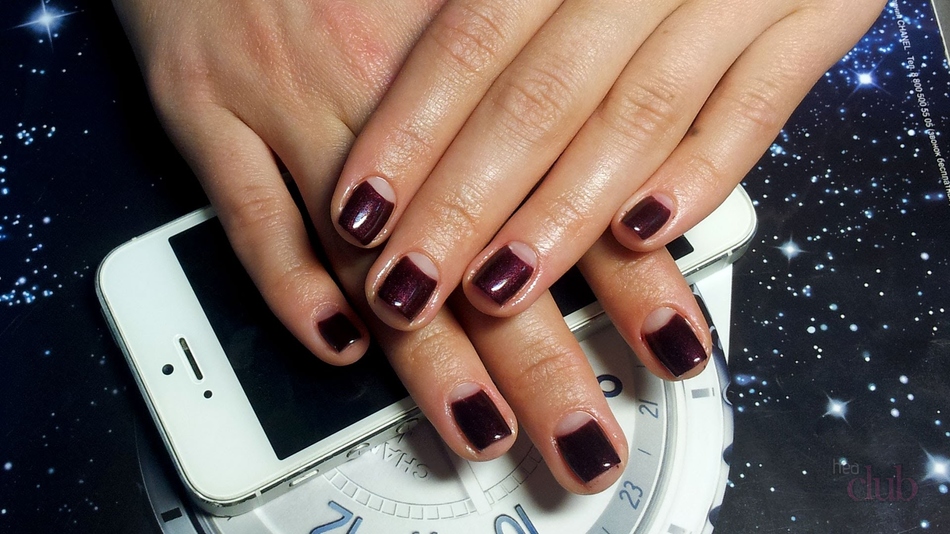
Burgundy moon manicure
 Elegant maroon nails

Burgundy color allows you to create the most elegant and feminine nail design. If you use light shades of burgundy to create a moon manicure, then your nails will look very delicate, especially if you combine them with white. If you use shellac in darker shades, you will end up with a solemn evening design.
Black and white moon manicure
 Black and white French
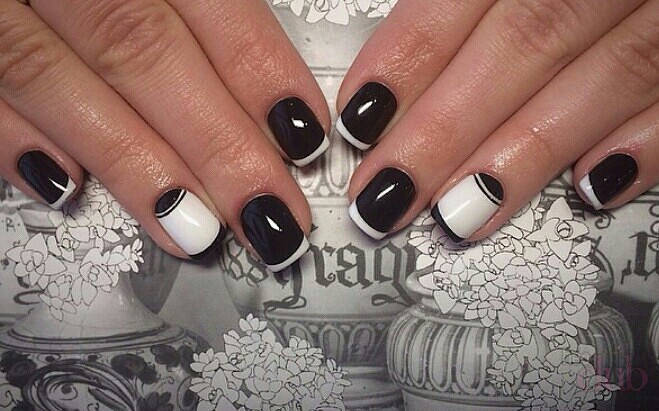
Black and white nail designs have never gone out of style. If you skillfully use these two colors, then you can create two or three completely different variations of the original nail art, which will look equally good with everyday and holiday outfits. This design will definitely help emphasize your individuality and make you more noticeable.
Lunar manicure in pastel colors
 pastel shades
Pastel colors do moon design very calm, soft and feminine. This nail art looks equally good on both meek and long nails. And if you think that the pastel range allows you to create only a calm, discreet manicure, then you are deeply mistaken.
If you try to combine warm shades of green and cold yellow, then you will end up with a rather catchy, eye-catching design.
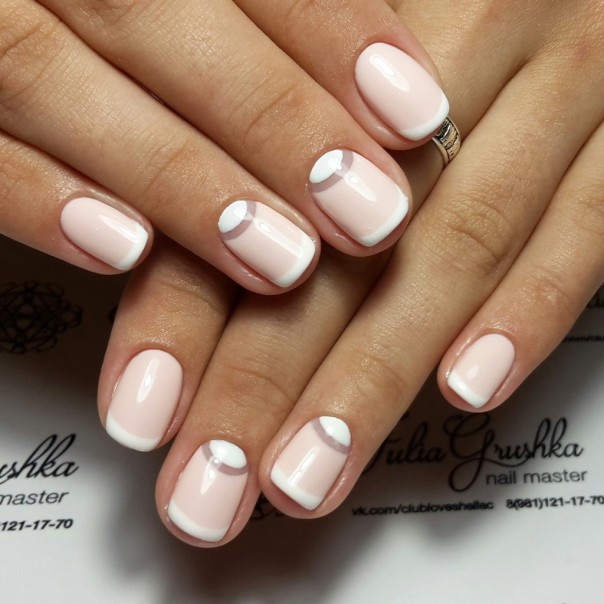
Lunar manicure pink and white
 Pink shellac design

Pink in combination with white allows you to make an inverted jacket as feminine, sophisticated and very cute as possible. Such a simple, at first glance, design goes well with almost all styles of clothing and, best of all, makes ladies' hands more elegant.
Lunar cat eye manicure
 cat eye
This effect can be achieved using gel polish, which contains the smallest possible metal particles. After application, you will have to act on the nail plate with a magnet, and the pieces of metal will gather into a pattern that will visually resemble a cat's eye.
Lunar manicure with a transparent strip, with a double hole

Nail art made in this way always looks very harmonious and complements the most daring images very well. But in order for such a design to look as beautiful as possible, it is extremely important to be able to combine colors correctly. Try not to be too contrasting and complement each other softly enough.
Lunar triangle manicure
 triangular jacket

Lunar nail art with a triangle will appeal to girls and women who live very dynamically and are always in the thick of things. Since such a design is more in line with fashion trends than others, it will definitely be able to emphasize their individuality and independence.
Lunar manicure raspberry
 Crimson nail art
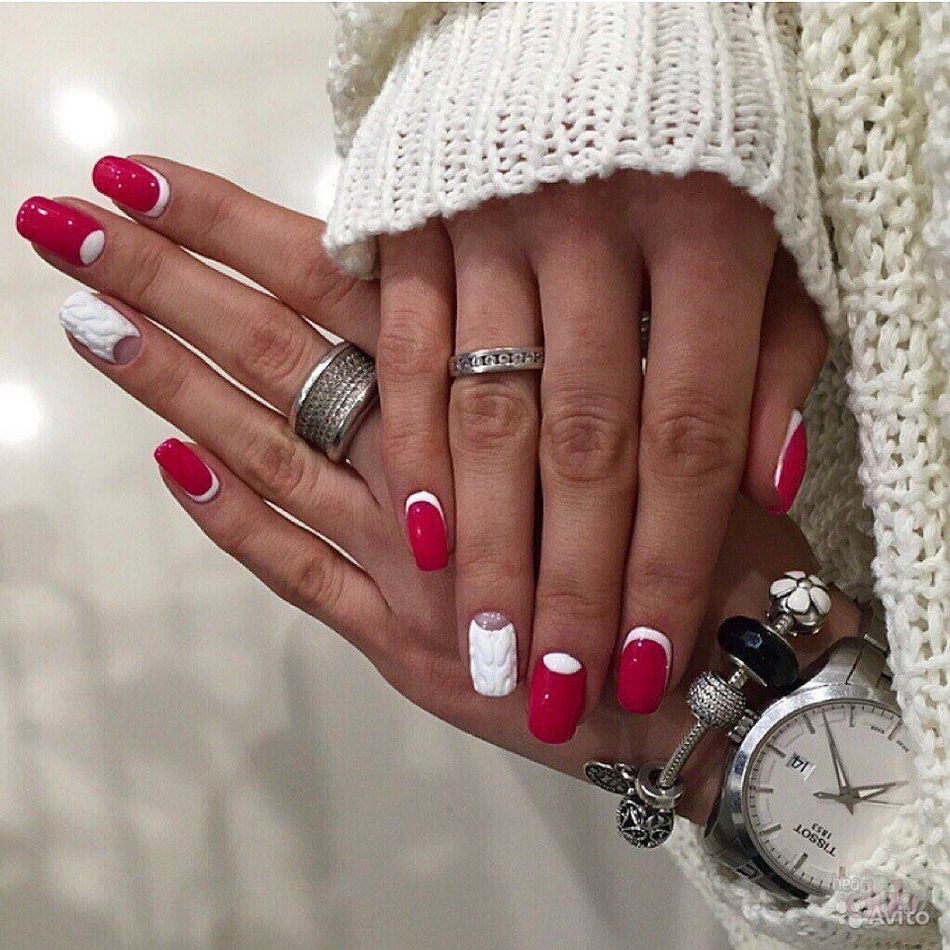

Perhaps, a manicure of this color can be called the brightest. This color will not be able to muffle either haze or other, calmer shades. Therefore, if even with the arrival of the autumn cold you want to feel the presence of summer, then cover your nails with shellac of any pink shade.
Manicure orange moon
 orange design
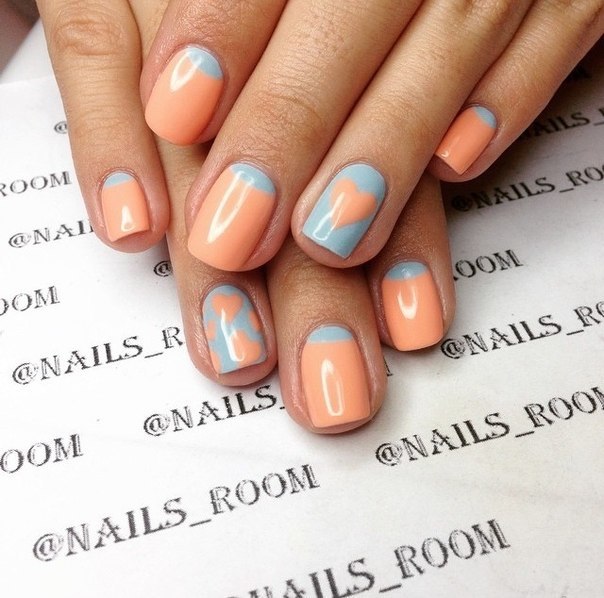
The moon design in orange as well as pink will remind you of summer, sun and vacation. Shellac of this shade looks best with a black coating. But if such a color scheme seems very gloomy to you, then dilute it with orange, sky blue, light green, rich brown and deep purple shellac.
Peach moon manicure
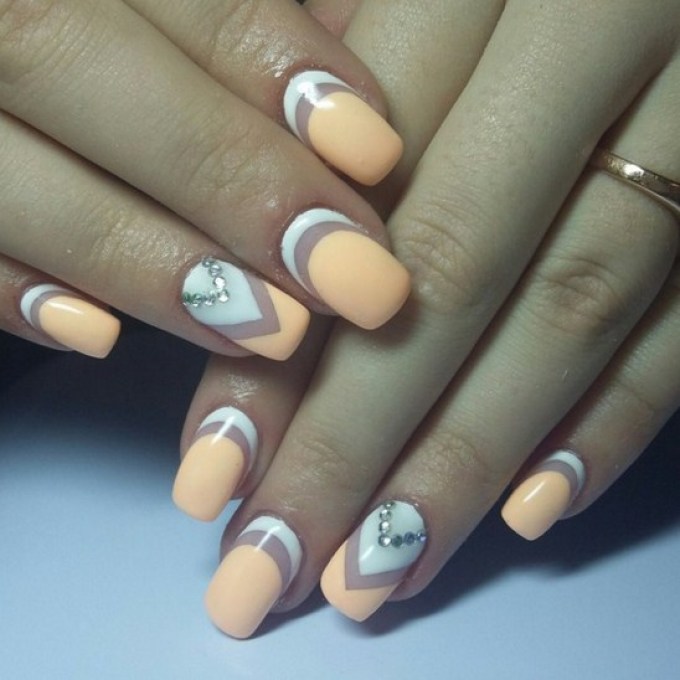 peach nail art
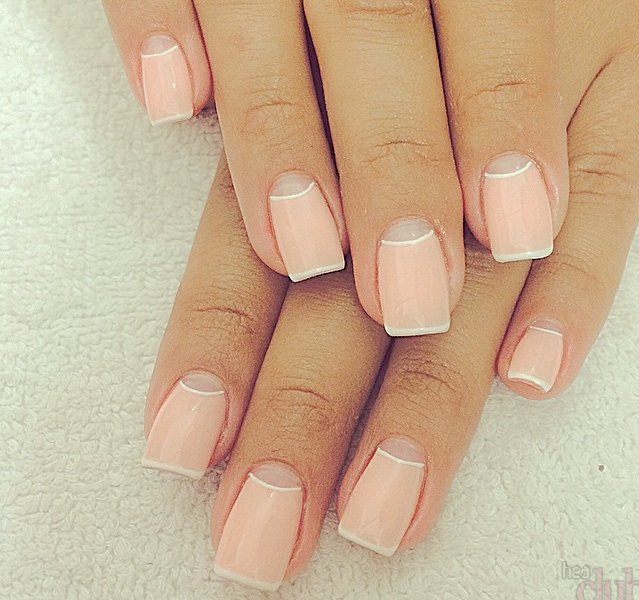

Peach nail art looks very light and fresh. And if you complement this design with delicate painting and small rhinestones, then your pens will seem very sophisticated and airy.
A manicure will also look very beautiful and restrained if you combine a peach shade with black, chocolate, beige and golden colors.
Lunar manicure turquoise
 Turquoise shade design

Lunar manicure in turquoise color without exaggeration can be called the most spectacular. A bright contrast hole will add even more originality to such nail art. It can be purple, yellow, lilac and white.
You can also safely complement the turquoise jacket with sparkles, rhinestones and gold ribbons. All this will make your nails even more attractive.
Lunar manicure red with black
 Combination of red and white
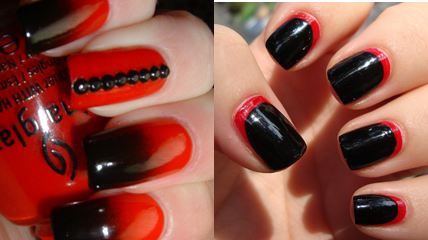
A red and black manicure combined with silver or gold ribbons will help you create the image of a woman who can overcome any obstacles. And if you want to slightly reduce its aggressiveness, then try laying a thin whitening line and a rhinestone along the edge of the hole.
Lunar manicure on the legs
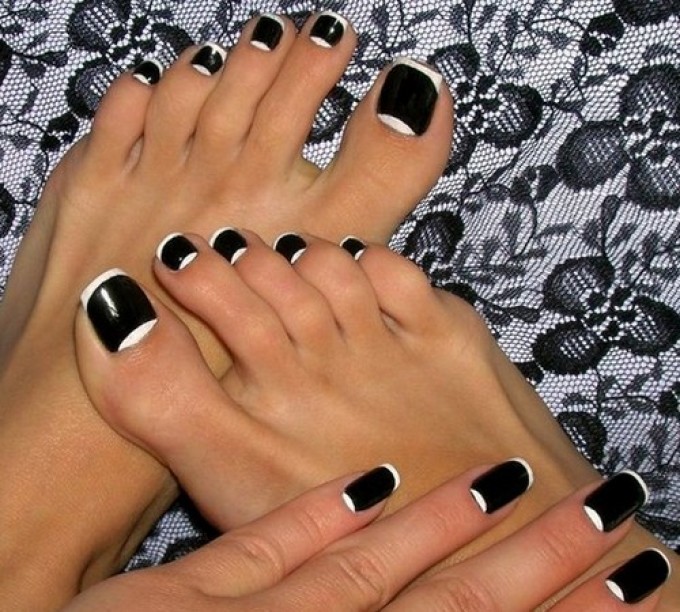 original pedicure
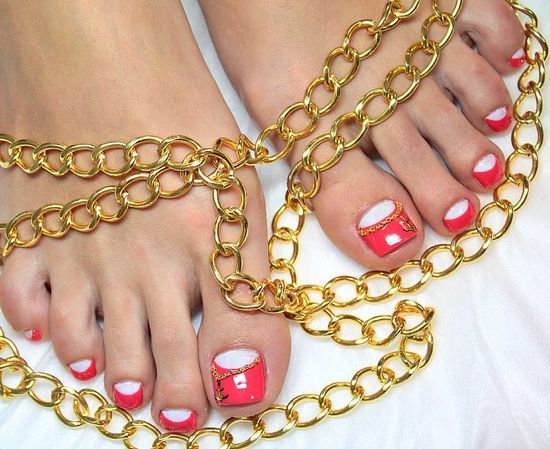

Lunar pedicure is done according to the same principle as a manicure for hands. Therefore, you can quite easily use any color scheme, as well as all kinds of ribbons, stickers and rhinestones.
The only taboo in this case will be glitter nails. Such a design will look very extravagant, which will allow it to attract a lot of attention.
Lunar French is now extremely popular. Initially, manicure, as a way to decorate nails, appeared in the 20s, after which it was forgotten. Modern trends have returned the design, so beauty salons offer it to their visitors. As a rule, the moon jacket is done with gel polish. Consider how to make a moon manicure with gel polish on your own, features and secrets of implementation.
What you need
To make an unusual moon manicure, you will need a base, topcoat, colored varnishes and additional accessories. The required materials depend on the complexity of the idea. Therefore, for the simplest option, you only need a thin brush or stencils. Additionally, rhinestones are used.
The easiest way
There are several methods for making moon gel polish, and the simplest of them includes the following steps:
- Hygienic manicure. It includes the removal of the old coating, giving the nail plate the necessary shape, as well as processing the cuticle.
- base layer. The next step is to apply the base coat. It must be dried with an ultraviolet lamp.
- Colored varnish. It is applied in two layers, each of which is dried with a UV lamp.
- Applying a finishing coat.
- Glue. After that, a special glue should be carried to the area where you want to place the crescent. You can choose any adhesive for transfer foil, but it must be transparent. Let the glue dry.
- Foil. Pre-prepare the transfer foil by cutting it into pieces that are convenient for work. Apply foil to the moon of the nail and press firmly. Then remove the foil. A colored strip will be imprinted on the moon of the nail. If the foil is transferred unevenly, press it again to the nail.
- Top composition. The last layer is a simple gel polish top coat. Dry it, the moon manicure is ready.
If you have any questions, watch this video tutorial:
Another option using foil can be seen in the photo:

Here a thick layer of gel polish is applied over the foil, which gives a special effect.
What other options for a moon jacket can there be?
Manicure nails with holes can be done in other ways. The choice of method depends on your skills and the desired effect. One of the most popular ways is to use a special brush. Also, for such a manicure, you will need two types of colored gel polish, a base and top coat, as well as a special lamp.
tassel
Step-by-step creation of a moon manicure with a brush:
- This design option also begins with a hygienic manicure. Remove the old varnish, remove the cuticle, give the nails the desired shape. Then the base layer is applied.
- Apply color gel polish and dry with a UV lamp.
- Using a brush, you need to draw the border of the hole with the second colored varnish on the nail. Then completely paint over the hole with the second color with a brush. Dry with a UV lamp.
- Apply topcoat and dry.
At all stages you need to be very careful! Somewhat easier - to resort to the use of templates!
with stencil
So, another way to create a moon manicure is to use special stencils. The design with a stencil allows you to make a stylish manicure yourself, for which you will have to pay a tidy sum in the salon.

The main steps in creating a lunar house design with a stencil:
- Hygienic manicure. After cleansing the old coating and shaping the nails, it is necessary to apply the base and dry.
- After that, a color coating is applied, which will be on the hole. It must be applied to the entire surface of the nail. Then dry with a UV lamp.
- Cut and glue the strips. For convenience, you can buy its ready-made stencils. They are easier to attach and have an optimal shape.
- Apply a layer of gel polish in a contrasting color to the nail plate behind the stencil strip. Remove the stencil. Dry with a UV lamp.
- It remains only to remove the stencil, and apply the finish coat. Additionally, rhinestones or other decorative elements can be glued to the color connection line.

The video tutorial will allow you to understand the intricacies of each stage, but even without a video it is easy to understand the technology for creating a moon manicure.
By the way, we have a whole article on our site about. Read it, you won't regret it!
Features, secrets
To make a lunar design correctly, it is not enough to use photos and step-by-step instructions. You will need to know the main secrets of its application:
- Do not apply many layers of gel polish. In this case, the manicure may look messy.
- Use the most contrasting shades of varnishes.
- The moon jacket looks great on both square and round, long and short nails.
- On short nails, when creating a moon manicure, it is better not to use a large number of decorative elements.
- Before drying the gel polish, the stencils should be removed, otherwise the holes will have torn edges.

Regular and reverse moon manicure in the photo. Done with gel polish.
Lunar manicure with gel polish is the return of an old tradition using modern materials. Its creation does not require special skills and takes a minimum of time. However, in order for the result to be stylish and neat, you should use high-quality gel polishes and first make a hygienic manicure.
Another parting video lesson, it clearly demonstrates all the basic techniques discussed above.
In contact with


