If you decide to remove shellac yourself at home, then you have two ways or sign up for a procedure with a specialist to see how it is carried out in reality. Or study the material prepared by us and understand this simple manipulation on your own.
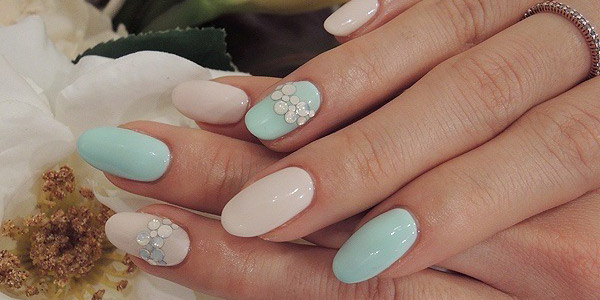
Due to its durability and strength, shellac has attracted and won the hearts of lovers of elegant manicure. But removing this coating is a real problem and if the technology is not followed, it can lead to injury to the nail plate. Therefore, for a solution, everyone turns to nail art salons, but if you have the necessary knowledge, then you can remove shellac at home.
What is this technology?
Shellac is a natural resin excreted by female insects. It is used for the production of gel polish, which is used in manicure art. This is the only gel-lacquer hybrid known to date.
This composition has many advantages, in particular:
- it dries quickly;
- it is not lubricated;
- it does not contain dibutyl phthalate, formaldehyde and toluene;
- it is long-term (such a manicure can be worn for more than one month, especially on the legs);
- he does not chip;
- it is hypoallergenic;
- it has a varnish effect;
- it allows you to strengthen the nails (especially if there are contraindications against the use of gel or acrylic varnish);
- does not require the use of special primers;
- it has no smell;
- it does not necessarily require polishing as the final stage of manicure.
The tool contains a unique composition, due to which it allows you to solve the problem of exfoliating, thin and brittle nails. This tool really protects the nails from negative external influences and strengthens them. With such a coating of nails, a depreciation effect is created, therefore, it is impossible to break nails with such a manicure.

Modern shellac coating is easy to apply.
Shellac removal is another advantage of this technology.
The varnish is “soaked” with a special false nail remover and removed within ten minutes. The applied coating crumbles and is easily removed with an orange stick.
When is it time to shoot?
There are no clear guidelines for when to remove shellac. It looks individual. If a girl works a lot with her hands - cleans, washes - then she needs to update her manicure more often. If she does not do housework, then she can remove the varnish much later.
How long does it keep?
Shellac usually lasts two to three weeks on hands. On the feet, it can last up to four to five weeks.
What happens to the varnish after a few weeks?
The instructions most often say that this gel polish lasts for two weeks. In ten to fourteen days, the nail plate grows by one and a half millimeters. A thin uncovered strip forms near the cuticle. Usually it is imperceptible, but the longer the varnish is worn, the more obvious it becomes.
Removing gel polish with a fraser
One of the most popular ways to remove shellac at home is to use a fraser. 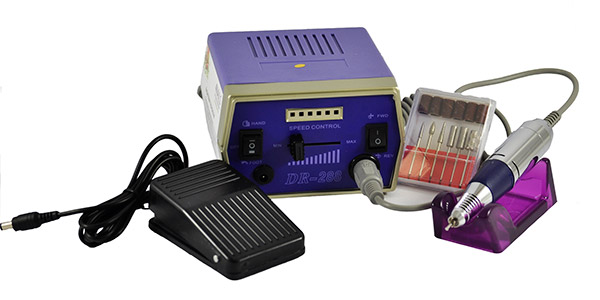
Cutting with this tool is quick and painless.
Is it safe to use a fraser?
When using a fraser, it is important to remember that this is a hardware method of removing the coating being applied. To avoid injury to the nails and negative consequences, it is necessary to use high-quality machines.
How to choose a suitable fraser for home use?
A framing machine with nozzles is included in the shellac kit, which is a must-have for removing gel polish at home.
The choice of a fraser depends on several important factors, in particular:
- terms of Use;
- machine volume;
- machine weight;
- stationary or portable working conditions;
- appearance of the machine;
- physical properties of the machine;
- machine speed;
- machine power.
The device must be selected based on the intended type of work. For example, for cleaning the nail arch and manicure, a fraser with a power of fifteen watts and 20,000 rpm is enough. More powerful machines are needed for nail extensions and hardware pedicure. They are used in beauty salons. For home use, such devices are not needed.
We remove shellac with improvised means
After some time after application, the manicure must be removed. Manicure needs to be updated and re-apply varnish on the nails.
What will be needed?
Before removing shellac(regardless of what design for short or long nails was made), you need to prepare all the tools necessary for the procedure. First of all, you will need cotton pads and sponges. You can also make foil.
Shellac removal technique at home
Preparation for the procedure begins with the fact that you need to thoroughly wash your hands with soap and wipe them dry. After that, soak the sponges with shellac remover. Each sponge must be fixed on the nail - the fingers must be externally wrapped in "bags". Then the liquid will be absorbed into the gel polish and slowly dissolve it. After fifteen minutes, the sponges can be removed. If pieces of varnish remain on the nails, they should be gently scraped off with an orange stick.
Precautionary measures
Removing shellac at home is a simple procedure. But it requires compliance with the technique of work. Therefore, the masters advise for the first time to remove it from a specialist in the salon in order to see with your own eyes the entire algorithm for carrying out this work. After that, you can try to experiment at home on your own.
How to choose a shellac remover?
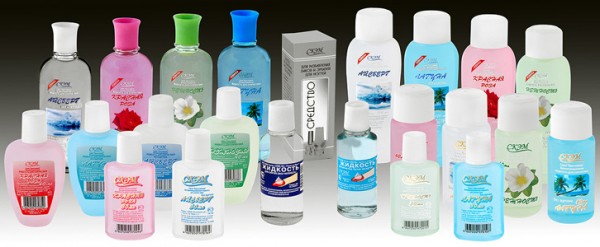
It is important to choose the right means for removing the coating (if the varnish will be removed independently). The most popular liquid for removing such a manicure is Severina. It's inexpensive but enough effective remedy. Dissolves varnish in twelve minutes. Can be used on natural and artificial nails.
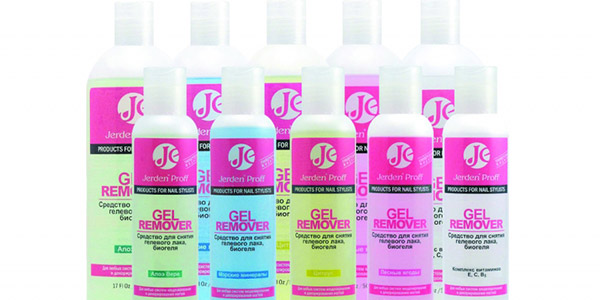
To remove shellac, as carefully as possible, you can use professional tools. For example, "Nano Professional", "Bluesky" or "Nourishing Remover", they remove varnish quickly and gently.
Not bad removes varnish - "Solomeya". This is an inexpensive tool, but unlike other special liquids, it dissolves the coating for about twenty minutes.
How can you not “remove” shellac?
Many masters of manicure art believe that shellac cannot be removed at home. At home, you will never make this procedure as perfect as in the salon with a specialist.
If you still decide, then the coating must be removed very carefully. You can’t tear it off, try to roughly tear it off. This will damage the nail bed. You can not use ordinary nail liquid for this procedure - this will not give any effect.
Is shellac harmful to the nail plate?
Experts say that shellac can be subject to temperature collisions. Cleaning or washing dishes with rubber gloves, taking a bath - all this leads to the fact that the nails begin to expand and narrow. This is facilitated by the influence of moisture and heat. Gradually, the nails take their usual shape. Such deformations cause microcracks in the coating through which water and dirt enter. This creates ideal conditions for the reproduction of pathogens. A fungus appears.
The main disadvantage of shellac is that it is an expensive salon procedure. Its cost is almost identical to the price for nail extensions. Such a coating must be regularly adjusted, especially if the nails tend to grow back quickly. It is problematic to independently carry out a correction at home. Therefore, this type of manicure is quite expensive.
Regardless of what varnishes will be used, if there is a fungus on the hands, then a manicure is not recommended. First you need to cure the fungal infection. It is also worth refusing the procedure while taking medications, especially antibiotics.
Not the best option to do a manicure on exfoliating nails. Pregnancy or lactation is not a contraindication.
The main advice for removing shellac is to choose the right way to remove varnish, prepare the necessary tools and carefully carry out the procedure. Then there will be no negative consequences in the form of injury to the nails.
Video: ways to remove shellac at home
The procedure for removing the coating from the surface of the nail must be carried out carefully. To avoid negative consequences, we advise you to watch today's videos. In them, we will consider the main methods of this simple procedure.
High-quality application of shellac requires a skill that is acquired only in manicure courses, and the availability of special equipment (ultraviolet lamp). Therefore, this operation is more likely to refer to salon procedures. Shellac coating lasts for a long time, at least two weeks. But what to do if during this time a manicure of one color is tired, or if a new image requires an urgent change in the color of nails? If you know how to remove shellac at home, then such difficulties will not arise. It remains only to remove the old coating, and then apply a new one.
Is it possible to remove shellac from nails at home
It is possible to remove shellac right at home and save money and time. But not all girls know how easy it is to remove shellac at home. In fact, this is a simple procedure and you do not need to have special skills to perform it. You just need to purchase a special shellac removal kit in the store or use improvised tools, which will be discussed below.
How to remove shellac coating yourself
Such a durable coating as gel polish cannot be removed with alcohol or cologne. This will require more serious drugs. But do not be afraid - everything you need is on sale, the price of many products is affordable even for beauties with a modest budget. It remains only to find out how the Shellac coating is removed at home, what means are used for this.
Professional gel polish remover without acetone
Many women avoid nail polish removers that contain acetone because they can't stand its strong smell and believe that acetone dries out nails and even causes cancer (the latter claim has not been proven). Therefore, manufacturers are releasing more and more acetone-free liquids, replacing the overly odorous ingredient in them with softer isopropyl alcohol or acetates.
Acetone-free liquids degrease and spoil the plates and skin, no less than products with acetone. But acetone-free products evaporate more slowly, which is convenient when you need to keep your nails wet for a while - this property is very useful when it comes to removing shellac. The most popular brands of acetone-free nail polish removers now are: “Product Remover”, “Severina”, “Bluesky”, “CND”.
Acetone nail polish remover and foil
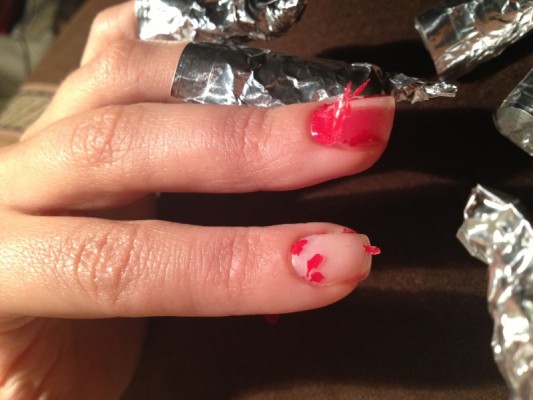
If it is impossible to get rid of the gel coating with the help of specialized products, the usual acetone remover will help, only you will have to keep it on the nails longer - not ten, but fifteen to twenty minutes. Resourceful beauties figured out how to remove shellac at home with foil. The liquid is applied to a simple cotton pad, applied to the nail, then fixed on the finger with a homemade metal cap.
With special wipes
These are wonderful helpers, helping to wash off the annoying coating almost on the go. Sold in sets of ten or more. They are oblong paper envelopes, inside of which there is a damp cloth moistened with a gel polish softener. The fingertip must be inserted into a sticky bag, wait the time set according to the instructions, and then wipe off the varnish.
How to replace the foil
Foil is the cheapest option, but if desired, it is replaced with reusable devices, such as thimble caps. Liquid is poured into them and the fingertips are lowered inside, waiting until the coating softens. Some skilled craftsmen know how to remove shellac from nails at home, fixing wet cotton wool on the nail with cellophane and “swaddling” the entire phalanx in it. But unlike foil, food film made of polyethylene does not hold its shape at all, so it is a poorly suited material for these purposes.
How to properly remove Shellac at home: step by step instructions
There are two ways to remove shellac at home. Both methods are described step by step below. The first method is useful for those who have at hand only the simplest manicure tools and devices, such as every girl who has done her own manicure at least once. To remove the second method, you will have to buy special sponges in the store.
Method number 1 - how to remove shellac at home if there is no special kit. You will need: aluminum foil, cotton wool or cotton pads, acetone-containing liquid or isopropyl alcohol, citrus wood sticks (orange or similar).
- Wash your hands with soap so that no traces of sebum remain on the nails.
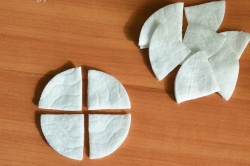
- Separate the cotton pads lengthwise into two thinner parts or cut into four equal parts: across and again across.
- Cut the foil into pieces the size of a matchbox.
- Saturate that part of the disk with liquid, which will then be adjacent to the nail (it is more convenient if this is the center of the disk).
- Attach the disc to the nail and tightly wrap the phalanx with foil so that the cotton wool is firmly fixed.
- Carry out this operation with each nail plate.
- After a quarter of an hour, release the first finger from the foil, scrape off the softened shellac with a stick.
- Remove the foil, scraping off the varnish in turn from each nail.
- If there are areas from which the varnish has not been scraped off, you need to repeat the procedure.
- Rub into the cuticles and nail plates to restore oil.
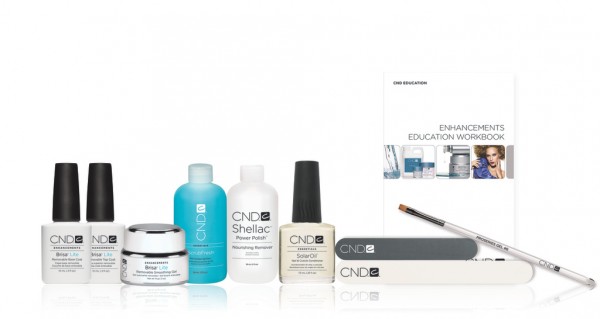
Method number 2 - How to quickly remove shellac at home using special chemicals and tools. You will need special disposable sponges with Velcro to hold, nail polish remover, scraping sticks and cuticle oil. All of these are sold individually or as a set.
- Hands are washed thoroughly with soap.
- Soak the sponge with the agent, wrap it around the phalanx, fasten the Velcro.
- Sponges are put on all fingers.
- Fill the hand bath with acetone, immerse the nails “packed” in sponges inside.
- After ten minutes, the fingers are pulled out of the bath and freed from the sponges.
- Remove varnish with a stick. It is not recommended to use a pusher or remover tweezers for scraping - metal tools will definitely damage the records.
- Lubricate the cuticle with nourishing oil.
Video: how to quickly and easily wash off gel polish yourself
How easy it is to remove shellac at home, see this video. It has a new technique for most girls, which makes it possible to properly remove shellac at home, while applying a minimum of physical effort. You will need a nail file. The video clearly shows the difference between using a specialized shellac remover and a cheap nail polish remover. In the comments (and there are more than a hundred of them) there are numerous useful tips from experienced beauties on how to remove shellac gel at home and answers to many pressing questions.
Post-procedure nail care tips
After shellac, the nails become a little thinner, weaker. For some time they require special care. The salon master immediately after removing the varnish will offer the necessary procedures for restoring the nail plates. A miracle will not happen after them, but the nails will recover faster than with home procedures. Experts consider sealing nails and paraffin therapy to be the most effective methods.
If financial possibilities do not allow you to take care of your nails in the salon, you will have to do it yourself by buying the necessary products in a specialized cosmetic or manicure store. It is possible to get by with simple home remedies - olive oil, lemon juice, bath salts, essential oils. Home recovery is carried out in stages.
Hydration and nutrition. Carried out using an oil bath. Heat the olive oil until slightly warm and dip your nails for five minutes. Then blot your fingertips with a tissue and wait ten minutes for the remaining oil to be absorbed. If the nails after shellac are too dry, break and exfoliate, the procedure is repeated several more times at intervals of a day.
Whitening. After removing shellac, it is sometimes found that the nail plates have turned yellow. In this case, they are bleached with lemon juice. Citric acid not only brightens, but also moisturizes and strengthens nails. Make a lemon nail mask as follows: cut the fruit in half and dip the fingertips into the pulp for 3-5 minutes, then rinse them under running water.
Strengthening. Baths with sea salt enriched with essential oils will help. This salt, designed specifically for hand care, is found in some lines of cosmetics, such as PRO Manicure, DNC, Blanc Bleu. An analogue of a special remedy can be ordinary sea salt from a pharmacy, but then you will have to add a few drops of essential oil to the bath, preferably ylang-ylang.
In almost any online store that sells shellac kits, nail care products for the recovery period are also presented. Such preparations contain organic and chemical complexes for the restoration, strengthening and resuscitation of nails. Most often on sale there are restorative compositions of the following brands:
- oils PN-Nourish Nageloil and Nail Hardener (Germany),
- nail resuscitator "Horsepower" (Russia),
- base coat after Restoration acrylic (USA),
- pencil Talika Nail Regenerator Serum (France).
Where to buy and how much do shellac removers cost?
The easiest way to buy a shellac remover at home is to visit specialized stores for manicure products. Finding them is very easy - every self-respecting outlet of this profile has at least an online page, or even an entire online store. These can be both stores with a wide range of products that sell products for all types of manicure, and specialized ones, aimed only at selling products for applying and removing shellac.
Lady Victory is a large wholesale and retail beauty products company. It has a network of representative offices in Russia and Ukraine and several online stores. The Moscow company store is located in the Dubrovka shopping complex at 13, Sharikopodshipnikovskaya St. The Kharkov store is the Barabashovo shopping center. The Odessa branch is located at Promrynka (7th kilometer).
Addresses of online stores Lady Victory:
- www.shop.lady-victory.com (Ukraine);
- lady-victory-world.com (Ukraine);
- nail-extension.com (Ukraine);
- shop-lady-victory.ru (Russia, Belarus, Kazakhstan).
Shilak.rf is an online beauty products store with a focus on selling shellac products. It sells tools for applying and removing shellac of almost any brand. There are equipment (UV lamps) and materials for nail repair on sale. The store and pickup point is located at Moscow, st. Letnikovskaya, 6a. Delivery works throughout Russia.
The pivot table will help determine the prices.
Shellac nail cosmetic was a hit with many women. Its advantages over conventional varnishes are obvious. Shellac lasts a long time, looks great, does not collapse when doing household chores: washing, cleaning, you can apply it on your nails. But, unlike a simple varnish, it requires a special technology for removing the coating. So how to remove shellac from nails correctly?
In principle, there is nothing complicated in removing shellac from nails. It can be removed both in the salon and at home. This is not a long time, and the set of tools for the procedure is minimal. Removing the coating yourself will save you from going to the salon and save money. But experts recommend contacting a professional for the first removal of shellac. Thus, you can see with your own eyes all the subtleties of the procedure.
Removing shellac in the salon is practically no different from home. The difference is only the experience of the master and expensive professional tools. Good beauty salons use shellac, CND brand remover and sponges. While at home, gel polish can also be removed with ordinary acetone, which is highly undesirable, as it harms the health of nails.
How is the procedure for removing shellac in the cabin?
- Before getting down to business, the master suggests that you wash your hands with soap and dry.
- Next, the professional soaks the sponges specially designed for the procedure in turn in the shellac remover and fixes them on your nails. The sponge is designed in such a way that the finger is as if wrapped in a bag, and the product acts on the desired area as efficiently as possible. The liquid does not spread, does not dry out and is well absorbed into the shellac, dissolving it.
- After 10-15 minutes, the master removes the sponges along with the shellac. If pieces of the coating remain on the nail, gently pry off the edge of the shellac with an orange stick and clean off the remnants.
- In conclusion, the master evaluates the condition of the nails, and you decide whether you need to do a shellac manicure again.
Important
As you can see, the procedure is quite simple and quite accessible for independent implementation. The matter remains small - choice of means for removing shellac.
- The most popular nail polish remover is Severina. It is also used to remove gel and biogel coatings. The demand for this tool is due to its excellent efficiency and inexpensive price. The exposure time of Severina for a stable result is only 12 minutes. Suitable for both natural and artificial nails.
- Professional tools include Nourishing Remover and Nano Professional. They not only remove the coating quickly, but also gently. Bluesky - especially effective for the CND brand. These three liquids are often used in specialized beauty salons.
- Solomeya is one of the most inexpensive products, but it copes well with shellac, although the exposure time to the coating can be increased up to 20 minutes.
This is just a small list of gel polish removers on the market. Manicurists recommend purchasing shellac nail polish remover from the same brand as gel polish. But the means of other brands will quite fulfill this task.
Specialized liquids for removing shellac can be replaced with conventional solvents. You can not use products that are not intended for nail care, but acetone or nail polish remover is fine. The duration of these compounds is from 20 minutes, but the coating is still removed without problems. Do not abuse such means. They can be used as a substitute if a special shellac remover is not available.
How to remove shellac at home: tips for beginners
How can you remove shellac at home:
- gel polish remover;
- sponges or cotton pads;
- foil nail wrap;
- manicure orange sticks;
- nail file (optional).
If all the funds are in place, then you can proceed to action. Before the procedure, prepare the workplace. Put everything in its place. Cut cotton pads into four or five parts, depending on the size of the nails. Cut the foil into pieces too.
How to remove shellac?
![]() If you have ever visited the salon and seen the work of the master, then you already better understand how to remove shellac at home. But still, for the first time, you need to be especially careful to take into account all the little things.
If you have ever visited the salon and seen the work of the master, then you already better understand how to remove shellac at home. But still, for the first time, you need to be especially careful to take into account all the little things.
- In the case when the shellac remover acts for a long time or liquids with aggressive chemical components, such as acetone, are used, first cut off the top layer of the coating with a nail file. Thus, it is possible to reduce the time of the procedure, and consequently, to minimize the harmful effects on the nails.
- Wash your hands with soap and dry. When working with acetone, it is necessary to protect the skin of the fingers and around the nails. To do this, apply a greasy cream to these areas, avoiding touching the nail plates.
- Moisten the previously prepared cotton pads with plenty of gel polish remover. Apply to the nails with the wide side to the base. Wrap your nails with foil or cling film so that there are no gaps left. The purpose of the wrap is to keep air out of the cotton pad so that the liquid doesn't dry out and works more effectively. Each nail is processed separately.
- Waiting for the action of the gel polish remover from 10 to 30 minutes. The duration of action depends on the type of shellac, the remover and the thickness of the coating. With experience, an understanding will come of what time in a particular case will be optimal.
- Remove foil and cotton pads. You will notice that the gel polish comes off in sheets. Carefully peel off the remaining pieces with orange sticks. In no case do not use metal tools, otherwise it is possible to injure the nail plate.
- Rinse your hands with clean water. Assess the condition of the nails. If shellac was applied several times in a row, then it would be good to treat the nails with the help of baths or professional products. Oil (with vitamin E) baths or wraps are very useful for nails.
note
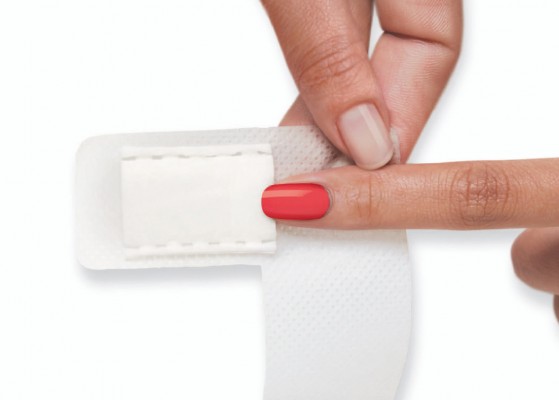
With the use of a special kit and professional fluids, the procedure is greatly simplified. The set includes sponge pockets. It is much easier to work with them. They are designed in the form of covers with a valve and Velcro, providing a snug fit on the fingers.
How else can you remove shellac at home:
- Aluminum foil is a great alternative - cling film. This material is very convenient to wrap the fingertips. It does not let air through and is cheaper.
- Another option for wrapping nails includes a regular thin plastic bag, cut into pieces and a band-aid. Polyethylene protects the cotton pad from drying out, and the patch fixes the design on the finger.
- Purchase plastic clips designed specifically for shellac removal and the procedure will be even easier. Such devices easily and securely fix cotton pads on the fingers.
If you love beautiful nails, then shellac is a great option for a colorful design of marigolds. Frequent nail extensions make them weak and brittle, while shellac does not have such a detrimental effect. But still, it should be borne in mind that both in the gel polish and in the means for its removal there are chemical components that negatively affect the nails. Therefore, nail care should include medical procedures to strengthen them.
- Using the Professional Kit
It is necessary to have knowledge on how to remove shellac at home if you intend to use the gel for application to nails on your own. Such a coating is beneficial, as it lasts a long time, but it is not easy to remove shellac. Gel polish is suitable for thin and brittle nails, it protects their surface, preventing the nail plate from exfoliating and breaking off. The varnish is convenient because it can last a month or longer.
Removing nail polish with home remedies
Shellac is made from biogel and requires a UV lamp to dry. The layer lasts for at least 3 weeks, and in order to remove it earlier, you need to perform a salon procedure. Of course, it is possible at home. To properly perform this action, you must definitely stock up on the proper attributes and study the material on how to remove shellac at home.
To remove the gel (in the absence of a special kit), you will need the following tools:
- cotton pads or cotton wool;
- aluminum foil;
- acetone or a liquid that washes off ordinary varnish;
- adhesive plaster (you can tape);
- cuticle pushers.
 Having prepared the necessary, you can proceed to the procedure for removing varnish, which is similar to removing acrylic. Before removing shellac at home, you need to degrease your nails. To do this, wash your hands thoroughly with soap and warm water.
To remove the lacquer coating, you need to follow the following steps:
- To save money, it is better to cut the discs in half, and cut the foil into ribbons of such length that they can freely wrap the upper phalanx of the finger.
- The cuticle and skin of the nails are smeared with a greasy cream, then cotton wool is moistened in acetone and applied to the nails.
- From above, cotton wool is wrapped with foil, which is fixed with adhesive tape.
- Then you need to wait 20 minutes, during which the shellac will soften and begin to peel off the nails.
- Then the foil and cotton wool are removed from the fingers in turn, and on the freed nail they begin to scrape off the varnish layer with a stick.
- After all nails are cleaned, they can be polished with a soft file and covered with a balm to restore the nail plate.
The nail polish remover kit includes sponges (ready-made wrappers equipped with sticky fixatives), a special emollient, sticks (which remove the softened layer), oil to strengthen nails and soften cuticles. After preparing the surface, sponges impregnated with a softening agent are applied to the nails. Each sponge is wrapped around the phalanx and carefully fixed. The wrapped fingertips are then dipped into a small container filled with acetone or another solvent for 10 minutes. Now you can remove one wrapper and remove peeled varnish from the nail with a stick. It remains only to treat each nail with oil.
Due to its durability, shellac is preferable to regular varnish. Such a coating can be done in the salon or (purchasing everything you need) apply it at home. With regular manicure, all costs quickly pay off.
Removing shellac at home saves a lot of time and money.
Having studied the technique of execution, the procedure for removing shellac can be done independently.
Shellac is a great alternative to gel or acrylic. Such a manicure is done using a special material, which is called Shellac. It is based on biogel, it is very similar to a simple varnish, but in terms of properties it is still a gel.
Dry it in an ultraviolet lamp. This coating does not crumble, does not chip, and stays on the nail plate for a long time (about two weeks).
And great for both manicure and pedicure (keeps on feet for 4-5 weeks).
Shellac is odorless and non-allergenic. It does not contain toluene, formaldehyde and its resins, dibutyl phthalate. Application does not cause problems for either the client or the master, as it is packaged like a regular varnish in a bottle with a brush.
Drying time in a UV lamp is only two minutes. So, how to remove shellac at home.
Removing shellac at home
If financial resources do not allow, or there is not enough time, then you can erase shellac at home. The procedure itself is very similar to the process of removing acrylic extended nails. But when removing shellac, you will not need to cut anything, as the product is applied to your nails. For this you need:
- cotton pads
- Foil (ribbons)
- Nail polish remover containing acetone
- Nail file
- Strong tape or adhesive tape
- Cuticle sticks
After you have purchased a complete set of necessary tools, you can begin to remove shellac:
- Cut the cotton swab so that it is convenient to put it on the plate. It is important to apply a greasy cream to the skin around the nail so that it does not suffer.
Wet pieces of a cotton swab in acetone or an acetone-containing liquid and apply them to the nail. By the way, you can use a special tool for removing shellac. It costs from 250 rubles.
And instead of cotton swabs, you can buy pads for removing shellac (about 250-300 rubles for ten pieces). Soaked tampons are applied to the nail and wrapped with foil tape. It can be fixed with tape or adhesive tape for reliability.
- Now you need to wait 15-20 minutes. If you are using a professional tool, then the time is indicated on the package. During this period, the shellac will soften and begin to move away from the plate.
From some plates, the agent will completely come off on its own. Proceed to the next finger only after you have removed the shellac from the previous one.
- Now you can process your nails with a soft nail file.
The procedure is best done first on one hand, then on the other. This will prevent slipping of swabs with foil.
What tools are used to remove shellac
- CND NOURISHING REMOVER- means for removing shellac, biogel, acrylic. Removes coating from nail plates within eight minutes.
The composition includes components with vitamin E and oils, which contributes to the gentle removal of varnish. Acts quickly and gently. Moisturizes nails. CND-Shellac Nourishing Remover is available in 50 ml, 236 ml and 946 ml. You can also buy this tool in the online store at an average price of 250, 700 and 1790 rubles, respectively.
- Severina to remove biogel and shellac. A very economical tool for removing gel polish, acrylic, shellac from a natural nail plate. The composition also includes oils and vitamin E.
Removes shellac in 8-10 minutes. Does not harm the nail and the skin around it. There is no acetone in the composition, which does not interfere with quickly coping with the task. Can also be used on non-natural nails.
Severin is supplied mainly in bottles with a pump-dosator. Volume 150 ml. It costs about 150 rubles. But you can also find simple bottles of 100 ml, the price is 90-100 rubles.
- Acetone- the most common remedy for removing shellac at home. Removes coverage well. But it may take about 15 minutes for the procedure.
You have to be very careful with acetone. The main thing is that the liquid does not get on the cuticle.
It is better to lubricate the skin around with liquid cream or oil. Acetone can be purchased at any hardware store.
The cost of one bottle of acetone 500 ml is an average of 50 rubles. Cheap and cheerful.
- Another economical option for removing shellac is acetone liquid for removing varnish. For example, Dream. Work with this liquid should be as careful as with acetone.
A 100 ml bottle costs about 40 rubles. You can also use nail polish remover. Despite the fact that the bottle says that there is no acetone in the composition, this is not entirely true.
Otherwise, the liquid would not be able to dissolve the varnish. Acetone is present, but in smaller quantities. Plus there is another type of solvent.
- Liquid for removal of bio-gel and MASURA tips. Suitable for removing shellac. 100 ml costs 300-350 rubles. Does not contain acetone, removes gently and quickly.
- Liquid for removing varnish Solomeya and shellac. The approximate price for 200 ml is 150-200 rubles. The tool perfectly cares for fragile and brittle nails.
The composition includes castor oil (prevents drying of the nail and cuticle), vitamin F (strengthens the plate), green tea extract (promotes the rapid growth of healthy nails).
The liquid has a delicate aroma. The bottle closes with a convenient disc-top cap, which allows you to dispense the product economically. Here's how to remove shellac.
Visiting the salon to resolve the issue
Not all the fair sex will want to remove shellac from their nails on their own. It is much more pleasant when a professional does it in the salon.
Removing shellac in the salon by a specialist exactly repeats this process at home, which was described above (moisten swabs with liquid, fix on nails, hold for a while, remove shellac with a special stick).
Only instead of cotton pads, special Shellac Remover Wraps sponges are used. The main difference: a specialist will do everything with the help of professional tools and tools.
In addition, before starting, a good pro will take all the necessary measures to protect your skin around the nail plate.
This will save you from unnecessary damage that you can get at home. Another important point: the salon knows exactly how long it takes to keep such a compress so that the shellac comes off quickly and easily.
And after the material is completely removed from the nails, the salon specialist will correct all the irregularities that have appeared on the nail with a soft non-metallic nail file. The price for this service may vary in different regions of the country. On average, a visit to the salon will cost you 350 rubles.
And it's not that expensive for those who don't know how to remove shellac properly. On average, you will stay in the cabin for no more than twenty minutes.
Nails after removing shellac. How to take care of them?
Despite the fact that the shellac coating is very good and resistant, after its removal there are many mixed reviews from the fair sex.
If someone has a natural predisposition to thinning or delamination of the nail plate, then it is quite possible that this problem will worsen after the removal of shellac. If you have naturally strong and healthy nails, then you have nothing to worry about.
The nails exfoliate because before applying the bio-gel, the master treats the plate with a special buff, which removes the layer of shine from the nail. The technology demands it. Therefore, each time the nail becomes thinner and thinner.
After each removal of shellac, it is better to let the nails rest for at least a couple of weeks. It is worth doing salt baths and applying special strengthening oils and varnishes to the plate.
The most effective will be oil with vitamin E. If you are not embarrassed by the condition of your nails, and they look quite healthy, then you can apply shellac again.
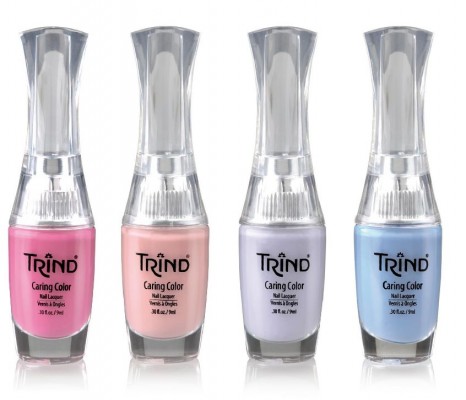
If, after removing the bio-gel, the plates began to exfoliate and became very thin, then they can be treated with the help of a special tool "Trind". It costs about 750 rubles.
Apply daily. Looks like a simple nail polish bottle. Full restoration of the nail occurs only after three months.
But you can be completely convinced of the advantages and disadvantages of shellac only by trying this type of manicure yourself. And to be convinced of the effectiveness of a particular nail polish remover, you can only try it.
Dear readers, if there are those among you who have made shellac, share your experience. Tell us where and how shellac was removed, what means were used.
A visual demonstration of how to shoot shellac at home is waiting for you on the video


